Spring-IOC
Spring IoC(Inversion of Control) 容器, Spring Context 上下文, Spring Beans 生命周期 相关笔记
Spring Lifecycle 接口
Lifecycle 是 Spring 中定义启停生命周期的通用接口。 可以被 Spring Bean 或 容器(比如 ApplicationContext)实现,被容器实现时会传播 启/停 信号给容器内的所有组件。
测试 Lifecycle 接口:
@Configuration
public class LifeCycleTest {

    @Test
    public void testLifeCycle() {
        AnnotationConfigApplicationContext applicationContext = new AnnotationConfigApplicationContext(LifeCycleTest.class);
        applicationContext.start();
        applicationContext.stop();
    }

    @Component
    public static class MyLifeCycle implements Lifecycle {
        private volatile boolean running = false;

        @Override
        public void start() {
            System.out.println("MyLifeCycle start");
            running = true;
        }

        @Override
        public void stop() {
            System.out.println("MyLifeCycle stop");
            running = false;
        }

        @Override
        public boolean isRunning() {
            return running;
        }
    }
}
单测运行结果打印 MyLifeCycle start MyLifeCycle stop
注意: 只有 isRunning() 返回 false 时,start 方法才会被执行。 只有 isRunning() 返回 true 时,stop() 方法才会被执行。
SmartLifecycle 接口
Lifecycle 不支持自动启动,必须手动调用应用上下文的 start()/stop() 触发,更常用的是 SmartLifecycle 接口,可实现应用上下文初始化完后自动回调 start() 接口。 注意:stop 通知在销毁前不能保证到达,有可能 stop() 方法不会被回调。
有多个 SmartLifecycle 实现类时,可以通过覆盖 getPhase() 设置先后顺序,getPhase() 值最小的最先开始,最后停止。 getPhase() 返回 Integer.MIN_VALUE 将在第一个开始和最后一个停止。相反,MAX_VALUE 将指示对象应该在最后启动并首先停止。
SmartLifecycle 常用于在 Spring 加载和初始化完所有 bean 后,接着执行一些初始化业务或者启动需要的异步服务。 Spring 容器加载所有 bean 并完成初始化之后,就会回调所有实现了 SmartLifecycle 的 bean 的 start() 接口。
测试 MySmartLifeCycle
@SpringBootTest
public class SmartLifeCycleTest {
    @Test
    public void testSmartLifeCycle() {
        System.out.println("执行此单测方法,输出中能看到 MySmartLifeCycle start 和 MySmartLifeCycle stop");
    }

    @Component
    public static class MySmartLifeCycle implements SmartLifecycle {
        private volatile boolean running = false;

        @Override
        public void start() {
            System.out.println("MySmartLifeCycle start");
            running = true;
        }

        @Override
        public void stop() {
            System.out.println("MySmartLifeCycle stop");
            running = false;
        }

        @Override
        public boolean isRunning() {
            return running;
        }
    }
}
Spring Bean生命周期
Spring Bean的生命周期简单易懂。在一个bean实例被初始化时,需要执行一系列的初始化操作以达到可用的状态。同样的,当一个bean不在被调用时需要进行相关的析构操作,并从bean容器中移除。
Spring Bean的创建和销毁
Spring Bean什么时候被实例化?
Spring什么时候实例化bean,首先要分2种情况
第一:如果你使用 BeanFactory 作为Spring Bean的工厂类,则所有的bean都是在第一次使用该Bean的时候实例化
第二:如果你使用 ApplicationContext 作为Spring Bean的工厂类,则又分为以下几种情况:
(1):如果bean的scope是singleton的,并且lazy-init为false(默认是false,所以可以不用设置),则ApplicationContext启动的时候就实例化该Bean,并且将实例化的Bean放在一个map结构的缓存中,下次再使用该Bean的时候,直接从这个缓存中取
(2):如果bean的scope是singleton的,并且lazy-init为true,则该Bean的实例化是在第一次使用该Bean的时候进行实例化
(3):如果bean的scope是prototype的,则该Bean的实例化是在第一次使用该Bean的时候进行实例化
spring的bean到底在什么时候实例化 http://www.iteye.com/problems/93479
Spring如何保证创建的Bean不被垃圾回收
Spring bean在程序结束时被销毁,期间不会被垃圾回收机制回收
Spring如何保证创建的bean不被垃圾回收? JVM通过可达性分析来判定对象是否存活。这个算法的基本思路就是通过一系列称为GC Roots的对象作为起始点,从这些节点开始向下搜索,搜索所走过的路径称为引用链,当一个对象到GC Roots没有任何引用链相连时,则证明此对象是不可用的。将会被判定为是可回收的对象。
在Java语言中,可作为GC Roots的对象包括下面几种: 1、虚拟机栈(栈帧中的本地变量)中引用的对象。 2、方法区中类静态属性引用的对象。 3、方法区中常量引用的对象。 4、本地方法栈中JNI(Native方法)引用的对象。
spring创建对象是通过实现接口BeanFactory的类来实现的 对象存放在一个Map中:
private final Map<String, Object> singletonObjects = new HashMap();
private final Map<String, Object> beans;
其中singletonObjects是用来存放单例对象的。singletonObjects和beans(在构造方法中new)都是直接使用关键字new创建,是强引用,满足作为GC Roots对象的条件(虚拟机栈(栈帧中的本地变量)中引用的对象)。这样创建的对象存在map中和GC Roots对象相连,所以不会被回收。
spring启动后保证创建的对象不被垃圾回收器回收 http://www.jb51.net/article/93933.htm
可在Bean创建后和销毁前被调用的方法
Spring bean factory 负责管理在 spring 容器中被创建的 bean 的生命周期。Bean 的生命周期由两组回调(call back)方法组成。 1、初始化之后调用的回调方法。 2、销毁之前调用的回调方法。
Spring 框架提供了以下四种方式来管理 bean 的生命周期事件: 1、InitializingBean 和 DisposableBean 回调接口 2、针对特殊行为的其他 Aware 接口 3、在 bean 的配置文件中指定 init-method 和 destroy-method 方法 4、@PostConstruct 和 @PreDestroy 注解方式
实现 InitializingBean 和 DisposableBean 接口
这两个接口都只包含一个方法。
通过实现 InitializingBean 接口的 afterPropertiesSet() 方法可以在 Bean 属性值设置好之后做一些操作
实现 DisposableBean 接口的 destroy() 方法可以在销毁 Bean 之前做一些操作。
public class GiraffeService implements DisposableBean {
    @Override
    public void afterPropertiesSet() throws Exception {
        System.out.println("执行InitializingBean接口的afterPropertiesSet方法");

    }

    @Override
    public void destroy() throws Exception {
        System.out.println("执行DisposableBean接口的destroy方法");
    }
}
这种方法比较简单,但是不建议使用。因为这样会将Bean的实现和Spring框架耦合在一起。
在bean的配置文件中指定init-method和destroy-method方法
Spring允许我们创建自己的init方法和destroy方法,只要在Bean的配置文件中指定init-method和destroy-method的值就可以在Bean初始化时和销毁之前执行一些操作。 如下:
public class GiraffeService {
    //通过<bean>的destroy-method属性指定的销毁方法
    public void destroyMethod() throws Exception {
        System.out.println("执行配置的destroy-method");
    }

    //通过<bean>的init-method属性指定的初始化方法
    public void initMethod() throws Exception {
        System.out.println("执行配置的init-method");
    }

}
配置文件中的配置:
<bean name="giraffeService" class="com.giraffe.spring.service.GiraffeService" init-method="initMethod" destroy-method="destroyMethod">
</bean>
需要注意的是自定义的init-method和post-method方法可以抛异常但是不能有参数。 这种方式比较推荐,因为可以自己创建方法,无需将Bean的实现直接依赖于spring的框架。
使用 @PostConstruct 和 @PreDestroy 注解
除了xml配置的方式,Spring也支持用 @PostConstruct 和 @PreDestroy 注解来指定 init 和 destroy 方法。
这两个注解均在 javax.annotation 包中。
为了注解可以生效,需要在配置文件中定义 org.springframework.context.annotation.CommonAnnotationBeanPostProcessor 或 context:annotation-config
public class GiraffeService {
    @PostConstruct
    public void initPostConstruct(){
        System.out.println("执行PostConstruct注解标注的方法");
    }

    @PreDestroy
    public void preDestroy(){
        System.out.println("执行preDestroy注解标注的方法");
    }
}
配置文件
<bean class="org.springframework.context.annotation.CommonAnnotationBeanPostProcessor" />
【Spring】Bean的生命周期 http://www.importnew.com/22350.html
Spring Bean生命周期详解 http://blog.csdn.net/a327369238/article/details/52193822
Bean初始化
【Spring源码分析】Bean加载流程概览 http://www.cnblogs.com/xrq730/p/6285358.html
【Spring源码分析】非懒加载的单例Bean初始化过程(上篇) http://www.cnblogs.com/xrq730/p/6361578.html
【Spring源码分析】非懒加载的单例Bean初始化过程(下篇) http://www.cnblogs.com/xrq730/p/6363055.html
InitializingBean 初始化接口(Bean实例化且属性set之后)
InitializingBean 接口为bean提供了属性初始化后的处理方法,它只包括 afterPropertiesSet 方法,凡是继承该接口的类,在bean的属性初始化后都会执行该方法。
package org.springframework.beans.factory;

/**
 * Interface to be implemented by beans that need to react once all their properties
 * have been set by a {@link BeanFactory}: e.g. to perform custom initialization,
 * or merely to check that all mandatory properties have been set.
 *
 * <p>An alternative to implementing {@code InitializingBean} is specifying a custom
 * init method, for example in an XML bean definition. For a list of all bean
 * lifecycle methods, see the {@link BeanFactory BeanFactory javadocs}.
 *
 * @author Rod Johnson
 * @author Juergen Hoeller
 * @see DisposableBean
 * @see org.springframework.beans.factory.config.BeanDefinition#getPropertyValues()
 * @see org.springframework.beans.factory.support.AbstractBeanDefinition#getInitMethodName()
 */
public interface InitializingBean {

    /**
     * Invoked by the containing {@code BeanFactory} after it has set all bean properties
     * and satisfied {@link BeanFactoryAware}, {@code ApplicationContextAware} etc.
     * <p>This method allows the bean instance to perform validation of its overall
     * configuration and final initialization when all bean properties have been set.
     * @throws Exception in the event of misconfiguration (such as failure to set an
     * essential property) or if initialization fails for any other reason
     */
    void afterPropertiesSet() throws Exception;
}
通过查看spring的加载bean的源码类 AbstractAutowireCapableBeanFactory 可以看到 invokeInitMethods 中
1、判断该bean是否实现了实现了InitializingBean接口,如果实现了InitializingBean接口,则调用bean的afterPropertiesSet方法
2、判断是否指定了init-method方法,如果指定了init-method方法,则再通过反射调用指定的init-method
3、在spring初始化bean的时候,如果该bean是实现了InitializingBean接口,并且同时在配置文件中指定了init-method,系统则是先调用afterPropertiesSet方法,然后在调用init-method中指定的方法。
/**
 * Give a bean a chance to react now all its properties are set,
 * and a chance to know about its owning bean factory (this object).
 * This means checking whether the bean implements InitializingBean or defines
 * a custom init method, and invoking the necessary callback(s) if it does.
 * @param beanName the bean name in the factory (for debugging purposes)
 * @param bean the new bean instance we may need to initialize
 * @param mbd the merged bean definition that the bean was created with
 * (can also be {@code null}, if given an existing bean instance)
 * @throws Throwable if thrown by init methods or by the invocation process
 * @see #invokeCustomInitMethod
 */
protected void invokeInitMethods(String beanName, final Object bean, @Nullable RootBeanDefinition mbd)
    throws Throwable {

  boolean isInitializingBean = (bean instanceof InitializingBean);
  if (isInitializingBean && (mbd == null || !mbd.isExternallyManagedInitMethod("afterPropertiesSet"))) {
    if (logger.isTraceEnabled()) {
      logger.trace("Invoking afterPropertiesSet() on bean with name '" + beanName + "'");
    }
    if (System.getSecurityManager() != null) {
      try {
        AccessController.doPrivileged((PrivilegedExceptionAction<Object>) () -> {
          ((InitializingBean) bean).afterPropertiesSet();
          return null;
        }, getAccessControlContext());
      }
      catch (PrivilegedActionException pae) {
        throw pae.getException();
      }
    }
    else {
      ((InitializingBean) bean).afterPropertiesSet();
    }
  }

  if (mbd != null && bean.getClass() != NullBean.class) {
    String initMethodName = mbd.getInitMethodName();
    if (StringUtils.hasLength(initMethodName) &&
        !(isInitializingBean && "afterPropertiesSet".equals(initMethodName)) &&
        !mbd.isExternallyManagedInitMethod(initMethodName)) {
      invokeCustomInitMethod(beanName, bean, mbd);
    }
  }
}
Spring核心接口之InitializingBean https://segmentfault.com/a/1190000012461362
BeanFactoryPostProcessor(所有Bean实例化之前)
BeanFactoryPostProcessor 和 BeanPostProcessor, 这两个接口,都是 Spring 初始化 bean 时对外暴露的扩展点。
这个方法的主要用途就是通过注入进来的 BeanFactory,在真正初始化 Bean 之前,再对 Spring 上下文做一些动态修改。增加或者修改某些 Bean 定义的值,甚至再动态创建一些 BeanDefinition 都可以。
BeanFactoryPostProcessor 源码如下:
package org.springframework.beans.factory.config;

import org.springframework.beans.BeansException;

@FunctionalInterface
public interface BeanFactoryPostProcessor {

    /**
     * Modify the application context's internal bean factory after its standard
     * initialization. All bean definitions will have been loaded, but no beans
     * will have been instantiated yet. This allows for overriding or adding
     * properties even to eager-initializing beans.
     * @param beanFactory the bean factory used by the application context
     * @throws org.springframework.beans.BeansException in case of errors
     */
    void postProcessBeanFactory(ConfigurableListableBeanFactory beanFactory) throws BeansException;
}
实现该接口,可以在 spring 的 bean 创建之前,修改 bean 的定义属性。
也就是说,Spring 允许 BeanFactoryPostProcessor 在容器实例化任何其它 bean 之前读取配置元数据,并可以根据需要进行修改。
例如可以把 bean 的 scope 从 singleton 改为 prototype,也可以把 property 的值给修改掉。
可以同时配置多个 BeanFactoryPostProcessor,并通过设置 order 属性来控制各个 BeanFactoryPostProcessor 的执行次序。
BeanFactoryPostProcessor 是在spring容器加载了bean的定义文件之后,在bean实例化之前执行的。
BeanFactoryPostProcessor 是个函数式接口,只有一个方法 postProcessBeanFactory , 入参是 ConfigurrableListableBeanFactory,使用该参数可以获取到相关bean的定义信息。
Spring内置BeanFactoryPostProcessor实现类
spring中,有内置的一些 BeanFactoryPostProcessor 实现类,常用的有: org.springframework.beans.factory.config.PropertyPlaceholderConfigurer, 负责用.properties配置文件中的value替换key占位符。 org.springframework.beans.factory.config.PropertyOverrideConfigurer org.springframework.beans.factory.config.CustomEditorConfigurer, 用来注册自定义的属性编辑器
PropertyPlaceholderConfigurer
从 Spring 5.2 开始, PropertyPlaceholderConfigurer 已被标为废弃。
PropertyPlaceholderConfigurer 是个bean工厂后置处理器的实现,也就是 BeanFactoryPostProcessor 接口的一个实现。
PropertyPlaceholderConfigurer 可以将上下文(配置文件)中的属性值放在另一个单独的标准 java Properties 文件中去。在XML文件中用 ${key} 替换指定的properties文件中的值。这样的话,只需要对properties文件进行修改,而不用对xml配置文件进行修改。
在Spring中,使用PropertyPlaceholderConfigurer可以在XML配置文件中加入外部属性文件,当然也可以指定外部文件的编码,如使用location属性加载单个配置文件:
<bean id="propertyConfigurer" class="org.springframework.beans.factory.config.PropertyPlaceholderConfigurer">
   <property name="location">
     <value>conf/sqlmap/jdbc.properties</value>
   </property>
   <property name="fileEncoding">
     <value>UTF-8</value>
   </property>
</bean>
也可以使用locations属性加载多个配置文件,如:
<bean id="propertyConfigurer" class="org.springframework.beans.factory.config.PropertyPlaceholderConfigurer">
  <property name="locations">
   <list>
    <value>/WEB-INF/mail.properties</value>
    <value>classpath: conf/sqlmap/jdbc.properties</value>//注意这两种value值的写法
   </list>
  </property>
</bean>
查看源代码,可以发现,locations属性定义在PropertyPlaceholderConfigurer的祖父类 PropertiesLoaderSupport中,而location只有 setter方法。类似于这样的配置,在spring的源程序中很常见的。
PropertyPlaceholderConfigurer如果在指定的Properties文件中找不到你想使用的属性,它还会在Java的System类属性中查找。
所以,我们可以通过System.setProperty(key, value)或者JVM参数-Dproperty=value来给Spring配置文件传递参数。
Spring通过Properties文件配置数据源
spring中配置dbcp连接池:
<bean id="propertyConfigurer" class="org.springframework.beans.factory.config.PropertyPlaceholderConfigurer">
  <property name="locations">
   <list>
    <value>classpath:conf/sqlmap/jdbc.properties </value>
   </list>
  </property>
</bean>

<bean id="dataSource" class="org.apache.commons.dbcp.BasicDataSource" destroy-method="close">
  <property name="driverClassName" value="${jdbc.driverClassName}" />
  <property name="url" value="${jdbc.url}" />
  <property name="username" value="${jdbc.username}"/>
  <property name="password"value="${jdbc.password}" />
</bean>
jdbc.properties配置文件:
jdbc.driverClassName=com.mysql.jdbc.Driver
jdbc.url=jdbc:mysql://localhost/mysqldb?useUnicode=true&characterEncoding=UTF-8&zeroDateTimeBehavior=round;
jdbc.username=root
jdbc.password=123456
Spring的PropertyPlaceholderConfigurer应用 http://www.cnblogs.com/susuyu/archive/2012/09/10/2678458.html
Spring通过properties配置数据库链接以及注意事项 http://blog.csdn.net/jingshuigg/article/details/12649023
BeanPostProcessor 源码如下
package org.springframework.beans.factory.config;

import org.springframework.beans.BeansException;
import org.springframework.lang.Nullable;

public interface BeanPostProcessor {
    @Nullable
    default Object postProcessBeforeInitialization(Object bean, String beanName) throws BeansException {
        return bean;
    }

    @Nullable
    default Object postProcessAfterInitialization(Object bean, String beanName) throws BeansException {
        return bean;
    }
}
BeanPostProcessor, 可以在 Spring 容器实例化 bean 之后,在执行 bean 的初始化方法 之前 postProcessBeforeInitialization 或 之后 postProcessAfterInitialization ,添加一些自己的处理逻辑。这里说的初始化方法,指的是下面两种:
1)bean 实现了 InitializingBean 接口,对应的方法为 afterPropertiesSet
2)在 bean 定义的时候,通过 init-method 设置的方法
注意: BeanPostProcessor 是在 spring 容器加载了 bean 的定义文件并且实例化 bean 之后执行的。 BeanPostProcessor 的执行顺序是在 BeanFactoryPostProcessor 之后。
自定义 BeanPostProcessor 打印全部 Spring 加载的Bean
@Slf4j
@SpringBootTest
public class BeanPostProcessorTest {

    @Test
    public void test() {
        log.info("启动后能看到很多 加载Bean: xxx");
    }

    @Slf4j
    @Component
    public static class MyBeanPostProcessor implements BeanPostProcessor {
        @Override
        public Object postProcessBeforeInitialization(Object bean, String beanName) throws BeansException {
            log.info("加载Bean: {}", beanName);
            return bean;
        }

        @Override
        public Object postProcessAfterInitialization(Object bean, String beanName) throws BeansException {
            return bean;
        }
    }
}
Spring内置BeanPostProcessor实现类
Spring 中,有内置的一些 BeanPostProcessor 实现类,例如:
org.springframework.context.annotation.CommonAnnotationBeanPostProcessor, 支持 @Resource 注解的注入 org.springframework.beans.factory.annotation.RequiredAnnotationBeanPostProcessor, 支持 @Required 注解的注入 org.springframework.beans.factory.annotation.AutowiredAnnotationBeanPostProcessor, 支持 @Autowired 和 @Value 注解的注入 org.springframework.orm.jpa.support.PersistenceAnnotationBeanPostProcessor, 支持 @PersistenceUnit 和 @PersistenceContext 注解的注入 org.springframework.context.support.ApplicationContextAwareProcessor, 用来为bean注入 ApplicationContext 等容器对象
Spring的BeanFactoryPostProcessor和BeanPostProcessor https://blog.csdn.net/caihaijiang/article/details/35552859
Bean生命周期执行顺序
Bean生命周期执行顺序
- spring容器加载bean定义文件
- BeanFactoryPostProcessor.postProcessBeanFactory()
- 实例化Bean
- BeanPostProcessor.postProcessBeforeInitialization()
- 设置bean属性
- InitializingBean.afterPropertiesSet()
- init-method()
- BeanPostProcessor.postProcessAfterInitialization()
- DisposableBean.destroy()
Spring 循环依赖
Spring 循环依赖问题fix https://www.jianshu.com/p/786f33060aa4
浅述 Spring 代理如何在循环依赖中解决的 https://juejin.im/entry/5b010a28f265da0b95276165
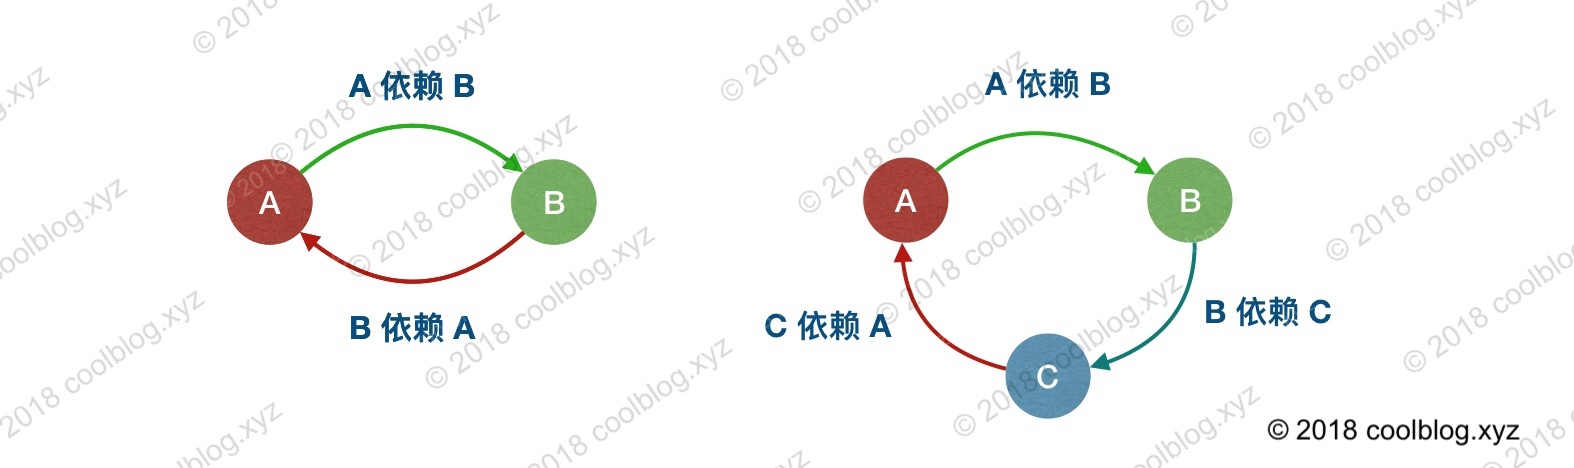
什么是循环依赖?
循环依赖其实就是循环引用,也就是两个或则两个以上的bean互相持有对方,最终形成闭环。比如 A 依赖 B,B 又依赖 A, 或者A 依赖 B,B 依赖 C,C 又依赖 A。
Spring循环依赖
Spring中循环依赖的三种场景?
(1)构造器的循环依赖 (2)field属性的循环依赖。
或者还可以细分为以下三种: (1)A的构造方法中依赖了B的实例对象,同时B的构造方法中依赖了A的实例对象 (2)A的构造方法中依赖了B的实例对象,同时B的某个field或者setter需要A的实例对象,以及反之 (3)A的某个field或者setter依赖了B的实例对象,同时B的某个field或者setter依赖了A的实例对象,以及反之 以上三种情况只能解决两种,第一种在构造方法中相互依赖的情况Spring也无力回天。
怎么检测是否存在循环依赖?
检测循环依赖相对比较容易,Bean在创建的时候可以给该Bean打标,如果递归调用回来发现正在创建中的话,即说明了循环依赖了。
Spring怎么解决循环依赖?
Spring对于循环依赖的解决不是无条件的,首先前提条件是针对scope是单例并且没有显式指明不需要解决循环依赖的对象,而且要求该对象没有被代理过。并且Spring无法解决构造器互相依赖的情况。
Spring的循环依赖的理论依据其实是基于Java的引用传递,当我们获取到对象的引用时,对象的field或属性是可以延后设置的(但是构造器必须是在获取引用之前)。
Spring的单例对象的初始化主要分为三步:
(1)createBeanInstance 实例化,实际上就是调用对应的构造方法构造对象,此时只是调用了构造方法,依赖属性还没有set。
(2)populateBean 填充属性,这一步主要是多bean的依赖属性进行填充
(3)initializeBean 调用spring xml中指定的init方法,或者AfterPropertiesSet方法。
循环依赖主要发生在第一、第二步。也就是构造器循环依赖和field循环依赖。那么我们要解决循环引用也应该从初始化过程着手。
以 “A的某个field或者setter依赖了B的实例对象,同时B的某个field或者setter依赖了A的实例对象” 这种循环依赖的情况为例: IOC 容器在扫描 bean 配置时( xml 配置,或 java config 配置,或 @ComponentScan ),会按照顺序,先去实例化 beanA。然后发现 beanA 依赖于 beanB,接在又去实例化 beanB。实例化 beanB 时,发现 beanB 又依赖于 beanA。如果容器不处理循环依赖的话,容器会无限执行上面的流程,直到内存溢出,程序崩溃。当然,Spring 是不会让这种情况发生的。在容器再次发现 beanB 依赖于 beanA 时,容器会获取 beanA 对象的一个 早期的引用(early reference),并把这个早期引用注入到 beanB 中,让 beanB 先完成实例化。beanB 完成实例化,beanA 就可以获取到 beanB 的引用,beanA 随之完成实例化。
这里所谓的”早期引用“是指向原始对象的引用,即 earlySingletonObjects 缓存中的引用。
三级单例Map缓存
DefaultSingletonBeanRegistry 类源码:
package org.springframework.beans.factory.support;

public class DefaultSingletonBeanRegistry extends SimpleAliasRegistry implements SingletonBeanRegistry {
  ... ...
    /** Cache of singleton objects: bean name to bean instance. */
    private final Map<String, Object> singletonObjects = new ConcurrentHashMap<>(256);

    /** Cache of singleton factories: bean name to ObjectFactory. */
    private final Map<String, ObjectFactory<?>> singletonFactories = new HashMap<>(16);

    /** Cache of early singleton objects: bean name to bean instance. */
    private final Map<String, Object> earlySingletonObjects = new HashMap<>(16);
  ... ...
}
这三级缓存分别指:
singletonObjects 单例对象缓存,用于存放完全初始化好的 bean,从该缓存中取出的 bean 可以直接使用
earlySingletonObjects 早期单例对象缓存,存放原始的 bean 对象(尚未填充属性),用于解决循环依赖
singletonFactories 单例工厂缓存,存放 bean 工厂对象,用于解决循环依赖
getSingleton()获取单例方法
Bean 初始化时,会调用从三级缓存获取 bean 单例的方法 getSingleton()
DefaultSingletonBeanRegistry 类源码:
package org.springframework.beans.factory.support;

public class DefaultSingletonBeanRegistry extends SimpleAliasRegistry implements SingletonBeanRegistry {
  ... ...
  @Override
    @Nullable
    public Object getSingleton(String beanName) {
        return getSingleton(beanName, true);
    }

    /**
     * Return the (raw) singleton object registered under the given name.
     * <p>Checks already instantiated singletons and also allows for an early
     * reference to a currently created singleton (resolving a circular reference).
     * @param beanName the name of the bean to look for
     * @param allowEarlyReference whether early references should be created or not
     * @return the registered singleton object, or {@code null} if none found
     */
    @Nullable
    protected Object getSingleton(String beanName, boolean allowEarlyReference) {
        Object singletonObject = this.singletonObjects.get(beanName);
        if (singletonObject == null && isSingletonCurrentlyInCreation(beanName)) {
            synchronized (this.singletonObjects) {
                singletonObject = this.earlySingletonObjects.get(beanName);
                if (singletonObject == null && allowEarlyReference) {
                    ObjectFactory<?> singletonFactory = this.singletonFactories.get(beanName);
                    if (singletonFactory != null) {
                        singletonObject = singletonFactory.getObject();
                        this.earlySingletonObjects.put(beanName, singletonObject);
                        this.singletonFactories.remove(beanName);
                    }
                }
            }
        }
        return singletonObject;
    }

  /**
     * Return whether the specified singleton bean is currently in creation
     * (within the entire factory).
     * @param beanName the name of the bean
     */
    public boolean isSingletonCurrentlyInCreation(String beanName) {
        return this.singletonsCurrentlyInCreation.contains(beanName);
    }
  ... ...
}
isSingletonCurrentlyInCreation() 判断当前单例bean是否正在创建中,也就是没有初始化完成(比如A的构造器依赖了B对象所以得先去创建B对象, 或则在A的populateBean过程中依赖了B对象,得先去创建B对象,这时的A就是处于创建中的状态。)
allowEarlyReference 参数表示是否允许从singletonFactories中通过getObject拿到对象
getSingleton()的过程:
Spring 首先从一级缓存 singletonObjects 中获取。如果获取不到,并且对象正在创建中,就再从二级缓存 earlySingletonObjects 中获取。如果还是获取不到且允许从 singletonFactories 中通过 getObject() 获取,就从三级缓存 singletonFactory.getObject() 中获取。
如果获取到了则:
this.earlySingletonObjects.put(beanName, singletonObject);
this.singletonFactories.remove(beanName);
从 singletonFactories 中移除,并放入 earlySingletonObjects 中。其实也就是从三级缓存移动到了二级缓存。
如果获取不到则返回 null
singletonFactories提前曝光的单例工厂
Spring 解决循环依赖的诀窍就在于单例工厂 Map singletonFactories 这个三级cache, 单例工厂是通过 addSingletonFactory 方法被添加到这个 Map 中去的。
DefaultSingletonBeanRegistry 类中源码如下:
/**
 * Add the given singleton factory for building the specified singleton
 * if necessary.
 * <p>To be called for eager registration of singletons, e.g. to be able to
 * resolve circular references.
 * @param beanName the name of the bean
 * @param singletonFactory the factory for the singleton object
 */
protected void addSingletonFactory(String beanName, ObjectFactory<?> singletonFactory) {
  Assert.notNull(singletonFactory, "Singleton factory must not be null");
  synchronized (this.singletonObjects) {
    if (!this.singletonObjects.containsKey(beanName)) {
      this.singletonFactories.put(beanName, singletonFactory);
      this.earlySingletonObjects.remove(beanName);
      this.registeredSingletons.add(beanName);
    }
  }
}
addSingletonFactory 被 doCreateBean 调用
AbstractAutowireCapableBeanFactory中
createBean(String beanName, RootBeanDefinition mbd, @Nullable Object[] args)
方法中调用
doCreateBean(final String beanName, final RootBeanDefinition mbd, final @Nullable Object[] args)
来完成 bean 实例的创建。
doCreateBean 方法中的逻辑很多:主要包括以下三部分:
1、其首先调用了 createBeanInstance 方法创建了一个原始的 bean 对象
2、随后调用 addSingletonFactory 方法向缓存中添加单例 bean 工厂,从该工厂可以获取原始对象的引用,也就是所谓的“早期引用”。
3、再之后,继续调用 populateBean 方法向原始 bean 对象中填充属性,并解析依赖。
protected Object doCreateBean(final String beanName, final RootBeanDefinition mbd, final Object[] args)
        throws BeanCreationException {

    BeanWrapper instanceWrapper = null;

    // ......

    // 1、 创建 bean 对象,并将 bean 对象包裹在 BeanWrapper 对象中返回
    instanceWrapper = createBeanInstance(beanName, mbd, args);

    // 从 BeanWrapper 对象中获取 bean 对象,这里的 bean 指向的是一个原始的对象
    final Object bean = (instanceWrapper != null ? instanceWrapper.getWrappedInstance() : null);

    /*
     * earlySingletonExposure 用于表示是否”提前暴露“原始对象的引用,用于解决循环依赖。
     * 对于单例 bean,该变量一般为 true。
     */
    boolean earlySingletonExposure = (mbd.isSingleton() && this.allowCircularReferences &&
            isSingletonCurrentlyInCreation(beanName));
    if (earlySingletonExposure) {
        // 2、 添加 bean 工厂对象到 singletonFactories 缓存中
        addSingletonFactory(beanName, new ObjectFactory<Object>() {
            @Override
            public Object getObject() throws BeansException {
                /*
                 * 获取原始对象的早期引用,在 getEarlyBeanReference 方法中,会执行 AOP
                 * 相关逻辑。若 bean 未被 AOP 拦截,getEarlyBeanReference 原样返回
                 * bean,所以大家可以把
                 *      return getEarlyBeanReference(beanName, mbd, bean)
                 * 等价于:
                 *      return bean;
                 */
                return getEarlyBeanReference(beanName, mbd, bean);
            }
        });
    }

    Object exposedObject = bean;

    // ......

    // 3、 填充属性,解析依赖
    populateBean(beanName, mbd, instanceWrapper);

    // ......

    // 返回 bean 实例
    return exposedObject;
}
可以看到,addSingletonFactory 调用在 createBeanInstance 之后,也就是说单例对象此时已经被创建出来(调用了构造器)。这个对象已经被生产出来了,虽然还不完美(还没有进行初始化的第二步和第三步),但是已经能被人认出来了(根据对象引用能定位到堆中的对象),所以 Spring 此时将这个对象提前曝光出来让大家认识,让大家使用。
这样做有什么好处呢?让我们来分析一下“A的某个field或者setter依赖了B的实例对象,同时B的某个field或者setter依赖了A的实例对象”这种循环依赖的情况。 A首先完成了初始化的第一步,并且将自己提前曝光到 singletonFactories 中,此时进行初始化的第二步,发现自己依赖对象B,此时就尝试去get(B),发现B还没有被create,所以走create流程,B在初始化第一步的时候发现自己依赖了对象A,于是尝试get(A),尝试一级缓存singletonObjects(肯定没有,因为A还没初始化完全),尝试二级缓存 earlySingletonObjects(也没有),尝试三级缓存singletonFactories,由于A通过 ObjectFactory 将自己提前曝光了,所以B能够通过 ObjectFactory.getObject 拿到A对象(虽然A还没有初始化完全,但是总比没有好呀),B拿到A对象后顺利完成了初始化阶段1、2、3,完全初始化之后将自己放入到一级缓存 singletonObjects 中。此时返回A中,A此时能拿到B的对象顺利完成自己的初始化阶段2、3,最终A也完成了初始化,进去了一级缓存 singletonObjects 中,而且更加幸运的是,由于B拿到了A的对象引用,所以B现在hold住的A对象完成了初始化。
知道了这个原理时候,肯定就知道为啥Spring不能解决“A的构造方法中依赖了B的实例对象,同时B的构造方法中依赖了A的实例对象”这类问题了!因为加入 singletonFactories 三级缓存的前提是执行了构造器,所以构造器的循环依赖没法解决。
Spring-bean的循环依赖以及解决方式 https://blog.csdn.net/u010853261/article/details/77940767
Spring源码初探-IOC(4)-Bean的初始化-循环依赖的解决 https://www.jianshu.com/p/6c359768b1dc
Spring IOC 容器源码分析 - 循环依赖的解决办法(源码解析非常详细) https://segmentfault.com/a/1190000015221968
Spring循环依赖的三种方式 https://blog.csdn.net/u010644448/article/details/59108799
Spring循环依赖异常 BeanCurrentlyInCreationException
当抛出这种异常时表示Spring解决不了该循环依赖
Spring容器将每一个正在创建的Bean 标识符放在一个“当前创建Bean池”中,Bean标识符在创建过程中将一直保持在这个池中,因此如果在创建Bean过程中发现自己已经在“当前创建Bean池”里时将抛出BeanCurrentlyInCreationException异常表示循环依赖;而对于创建完毕的Bean将从“当前创建Bean池”中清除掉。
Spring 源码阅读-循环依赖 https://my.oschina.net/u/2265027/blog/733097
FactoryBean 自定义Bean创建过程
【Spring源码:FactoryBean一】终于弄懂FactoryBean是如何自定义bean的创建过程了 https://blog.csdn.net/a1036645146/article/details/111661211
BeanDefinition 接口
BeanDefinition 用来描述 bean 实例,比如 属性值、构造方法参数等。
BeanDefinition 主要是为了让 BeanFactoryPostProcessor Bean后处理器能够访问和修改 bean 的属性值和其他 bena 元数据。
BeanDefinition 接口的方法覆盖了 Spring 构造 Bean 需要的所有信息,是否单例、是否原型,是一个什么样的类型,构造器有哪些实参,属性的值注入哪些值,使用哪个 FactoryBean 来获取 Bean等。
动态注册Bean
为什么需要动态注册Bean?
比如以注解的形式使用 MyBatis 时,定义了一个 Mapper 接口,如下:
public interface MyPageViewMapper {
    // 全站访问量按host的分布
    @Select("select host, sum(views) as 'views' from page_view group by host order by sum(views) desc;")
    List<PageViewSum> countPageViewSumGroupByHost();
}
自己不需要写任何实现类,只要把 mapper 接口的路径告诉 MyBatis
@MapperScan("com.masikkk.statistic.dao")
MyBatis就能给自动生成对应的实现类,然后我们使用时直接注入即可:
@Autowired
private MyPageViewMapper myPageViewMapper;
再比如,使用 feign 做声明式服务调用,
@FeignClient(name = "user", url = "localhost:8001", configuration = UserFeignConfig.class)
public interface UserClient {
    @GetMapping(value = "/api/users")
    QueryUsersV2Response getUsers(@Valid QueryUsersV2Request request);
}
也不需要写任何实现类,只需要告诉 feign 接口所在的路径,feign 也会自动给生成对应的实现类,我们使用时直接注入就可以了。
BeanDefinitionRegistry 和 SingletonBeanRegistry 接口
通过 BeanDefinitionRegistry 接口的 registerBeanDefinition(String beanName, BeanDefinition beanDefinition) 方法可以将 beanDefinition 注册到 Spring 上下文中。
通过 SingletonBeanRegistry 接口的 registerSingleton(String beanName, Object singletonObject) 方法可以将 单例实例 注册到 Spring 上下文中。
两者区别在于使用 registerBeanDefinition 时,Spring容器会根据 BeanDefinition 实例化bean实例,而使用 registerSingleton 时,bean实例就是传递给registerSingleton方法的对象。
DefaultListableBeanFactory 接口同时实现了这两个接口,在实践中通常会使用这个接口进行动态注册Bean。
可以在任何获得了 BeanDefinitionRegistry 或者 SingletonBeanRegistry 实例的地方进行动态注册。 1、在普通bean中进行动态注册 但是如果bean不是在BeanFactoryPostProcessor中被注册,那么该bean则无法被 BeanPostProcessor 处理,即无法对其应用aop、Bean Validation等功能。 2、在 BeanFactoryPostProcessor 中进行动态注册 在Spring容器的启动过程中,BeanFactory载入bean的定义后会立刻执行BeanFactoryPostProcessor,此时动态注册bean,则可以保证动态注册的bean被BeanPostProcessor处理,并且可以保证其的实例化和初始化总是先于依赖它的bean。
BeanDefinitionRegistry 接口源码
package org.springframework.beans.factory.support;

import org.springframework.beans.factory.BeanDefinitionStoreException;
import org.springframework.beans.factory.NoSuchBeanDefinitionException;
import org.springframework.beans.factory.config.BeanDefinition;
import org.springframework.core.AliasRegistry;

public interface BeanDefinitionRegistry extends AliasRegistry {

    void registerBeanDefinition(String beanName, BeanDefinition beanDefinition)
            throws BeanDefinitionStoreException;

    void removeBeanDefinition(String beanName) throws NoSuchBeanDefinitionException;

    BeanDefinition getBeanDefinition(String beanName) throws NoSuchBeanDefinitionException;

    boolean containsBeanDefinition(String beanName);

    String[] getBeanDefinitionNames();

    int getBeanDefinitionCount();

    boolean isBeanNameInUse(String beanName);
}
SingletonBeanRegistry 接口源码
package org.springframework.beans.factory.config;

import org.springframework.lang.Nullable;

public interface SingletonBeanRegistry {
    void registerSingleton(String beanName, Object singletonObject);

    Object getSingleton(String beanName);

    boolean containsSingleton(String beanName);

    String[] getSingletonNames();

    int getSingletonCount();

    Object getSingletonMutex();
}
手动创建Bean实例注入Spring上下文中
当我们创建了一个 BeanDefinion 后可以通过 BeanDefinitionRegistry 接口( GenericApplicationContext 实现了此接口)将新的 BeanDefinition 注册到spring上下文中。
void registerBeanDefinition(String beanName, BeanDefinition beanDefinition);
比如写一个 Bean 工厂后处理器,在所有bean实例化之前动态创建一个user实例注入spring上下文之中
public class MyBeanFactoryPostProcessor extends BeanFactoryPostProcessor {
  @Override
  public void postProcessBeanFactory(final ConfigurableListableBeanFactory beanFactory) throws BeansException {
    GenericBeanDefinition beanDefinition = new GenericBeanDefinition();
    beanDefinition.setBeanClass(User.class);
    beanDefinition.getPropertyValues().add("name", "张三");

    ((DefaultListableBeanFactory) beanFactory).registerBeanDefinition("dynamicUser", beanDefinition);
  }
}
其实 Spring 还提供了一个 BeanDefinitionRegistryPostProcessor 接口,也是个 BeanFactoryPostProcessor ,专门用来在所有bean实例化之前创建bean实例.
这个子接口的方法 postProcessBeanDefinitionRegistry 会被 Spring 先于 postProcessBeanFactory 这个方法执行。
package org.springframework.beans.factory.support;

import org.springframework.beans.BeansException;
import org.springframework.beans.factory.config.BeanFactoryPostProcessor;

public interface BeanDefinitionRegistryPostProcessor extends BeanFactoryPostProcessor {

    /**
     * Modify the application context's internal bean definition registry after its
     * standard initialization. All regular bean definitions will have been loaded,
     * but no beans will have been instantiated yet. This allows for adding further
     * bean definitions before the next post-processing phase kicks in.
     * @param registry the bean definition registry used by the application context
     * @throws org.springframework.beans.BeansException in case of errors
     */
    void postProcessBeanDefinitionRegistry(BeanDefinitionRegistry registry) throws BeansException;

}
Spring动态生成Bean的定义-BeanDefinition源码解析 https://www.jianshu.com/p/899bd8089352
ImportBeanDefinitionRegistrar
这个接口的实现类的作用是当这个接口的实现类被 @Import 接口引入某个被标记了 @Configuration 的注册类时,可以得到这个类的所有注解,然后做一些 动态注册Bean 的事儿。
Spring 官方在动态注册 bean 时,大部分套路其实是使用 ImportBeanDefinitionRegistrar 接口。 所有实现了该接口的类的都会被 ConfigurationClassPostProcessor 处理,ConfigurationClassPostProcessor 实现了 BeanFactoryPostProcessor 接口,所以 ImportBeanDefinitionRegistrar 中动态注册的 bean 是优先于依赖其的 bean 初始化的,也能被aop、validator等机制处理。
使用方法 ImportBeanDefinitionRegistrar 需要配合 @Configuration 和 @Import 注解, @Configuration 定义 Java 格式的 Spring 配置文件, @Import 注解导入实现了 ImportBeanDefinitionRegistrar 接口的类。
以 MyBatis 的动态注册 Bean 为例进行分析, @MapperScan 注解 import 了 MapperScannerRegistrar 类,这个类就实现了 ImportBeanDefinitionRegistrar 接口
在其 registerBeanDefinitions() 方法中会解析 @MapperScan 注解的属性,加载 basePackages ,并进行包扫描,把 basePackages下的 所有 Mapper 接口扫描出来并实例化注入 Spring IOC 容器中。
@Retention(RetentionPolicy.RUNTIME)
@Target(ElementType.TYPE)
@Documented
@Import(MapperScannerRegistrar.class)
@Repeatable(MapperScans.class)
public @interface MapperScan {
}
动态注册bean,Spring官方套路:使用ImportBeanDefinitionRegistrar https://zhuanlan.zhihu.com/p/30123517
BeanDefinition 接口源码
package org.springframework.beans.factory.config;

import org.springframework.beans.BeanMetadataElement;
import org.springframework.beans.MutablePropertyValues;
import org.springframework.core.AttributeAccessor;
import org.springframework.lang.Nullable;

public interface BeanDefinition extends AttributeAccessor, BeanMetadataElement {
    String SCOPE_SINGLETON = ConfigurableBeanFactory.SCOPE_SINGLETON;
    String SCOPE_PROTOTYPE = ConfigurableBeanFactory.SCOPE_PROTOTYPE;

    int ROLE_APPLICATION = 0;
    int ROLE_SUPPORT = 1;
    int ROLE_INFRASTRUCTURE = 2;


    // Modifiable attributes
    void setParentName(@Nullable String parentName);
    @Nullable
    String getParentName();

    void setBeanClassName(@Nullable String beanClassName);
    @Nullable
    String getBeanClassName();

    void setScope(@Nullable String scope);
    @Nullable
    String getScope();

    void setLazyInit(boolean lazyInit);
    boolean isLazyInit();

    void setDependsOn(@Nullable String... dependsOn);
    @Nullable
    String[] getDependsOn();

    void setAutowireCandidate(boolean autowireCandidate);
    boolean isAutowireCandidate();

    void setPrimary(boolean primary);
    boolean isPrimary();

    void setFactoryBeanName(@Nullable String factoryBeanName);
    @Nullable
    String getFactoryBeanName();

    void setFactoryMethodName(@Nullable String factoryMethodName);
    @Nullable
    String getFactoryMethodName();

    ConstructorArgumentValues getConstructorArgumentValues();
    default boolean hasConstructorArgumentValues() {
        return !getConstructorArgumentValues().isEmpty();
    }

    MutablePropertyValues getPropertyValues();
    default boolean hasPropertyValues() {
        return !getPropertyValues().isEmpty();
    }

    void setInitMethodName(@Nullable String initMethodName);
    @Nullable
    String getInitMethodName();

    void setDestroyMethodName(@Nullable String destroyMethodName);
    @Nullable
    String getDestroyMethodName();

    int getRole();

    void setDescription(@Nullable String description);
    @Nullable
    String getDescription();


    // Read-only attributes
    boolean isSingleton();
    boolean isPrototype();
    boolean isAbstract();
    @Nullable
    String getResourceDescription();
    @Nullable
    BeanDefinition getOriginatingBeanDefinition();
}
Spring 容器之 ApplicationContext 和 BeanFactory
Spring 的核心是容器,而容器并不唯一,框架本身就提供了很多个容器的实现,大概分为两种类型:
BeanFactory, 最所有容易的基础,是 IOC 容器的核心接口,它定义了 IOC 的基本功能, 提供基本的 DI 支持,由org.springframework.beans.factory.BeanFactory接口定义。ApplicationContext, 继承了BeanFactory后派生而来的抽象接口,由org.springframework.context.ApplicationContext接口定义,它能提供更多企业级的服务,例如解析配置文本信息等等,这也是应用上下文实例对象最常见的应用场景。 应用上下文使用更多、更普遍一些。
ApplicationContext 也继承了容器的高级功能,如:MessageSource(国际化资源接口)、ResourceLoader(资源加载接口)、ApplicationEventPublisher(应用事件发布接口)等。
//使用BeanFactory方式加载XML.
BeanFactory bf = new XmlBeanFactory(new ClassPathResource("beanFactoryTest.xml"));

//使用ApplicationContext方式加载XML.
ApplicationContext bf = new ClassPathXmlApplicationContext("beanFactoryTest.xml");
ApplicationContext 和 BeanFactory 对比
1、BeanFactory 延迟加载/ApplicationContext 立即实例化 BeanFactory 是延迟加载, 如果 Bean 的某一个属性没有注入,BeanFacotry 加载后,直至第一次使用调用 getBean 方法才会抛出异常; 而 ApplicationContext 则在初始化自身时检验,这样有利于检查所依赖属性是否注入;所以通常情况下我们选择使用 ApplicationContext。 ApplicationContext 继承自 BeanFactory,提供的功能更加强大,一般情况下都是使用 ApplicationContext
BeanFactroy 采用的是延迟加载形式来注入Bean的,即只有在使用到某个Bean时(调用getBean()),才对该Bean进行加载实例化,这样,我们就不能发现一些存在的Spring的配置问题。而ApplicationContext则相反,它是在容器启动时,一次性创建了所有的 Bean(lazy-init默认为false的情况下)。这样,在容器启动时,我们就可以发现 Spring 中存在的配置错误。 相对于基本的BeanFactory,ApplicationContext 唯一的不足是占用内存空间。当应用程序配置Bean较多时,程序启动较慢。
应用上下文则会在上下文启动后预载入所有的单实例Bean。通过预载入单实例bean ,确保当你需要的时候,你就不用等待,因为它们已经创建好了。
2、BeanFactory 和 ApplicationContext 都支持BeanPostProcessor、BeanFactoryPostProcessor的使用,但两者之间的区别是: BeanFactory需要手动注册,而ApplicationContext则是自动注册。(Applicationcontext比 beanFactory 加入了一些更好使用的功能。而且 beanFactory 的许多功能需要通过编程实现而 Applicationcontext 可以通过配置实现。比如后处理 bean , Applicationcontext 直接配置在配置文件即可而 beanFactory 这要在代码中显示的写出来才可以被容器识别。 )
3、BeanFactory 主要是面对与 spring 框架的基础设施,面对 spring 自己。而 ApplicationContext 主要面对与 spring 使用的开发者。基本都会使用 Applicationcontex 并非 beanFactory 。
注意,BeanFactory 只能管理单例(Singleton)Bean 的生命周期。它不能管理原型(prototype,非单例)Bean 的生命周期。这是因为原型 Bean 实例被创建之后便被传给了客户端,容器失去了对它们的引用。
Spring系列之beanFactory与ApplicationContext - 平凡希 https://www.cnblogs.com/xiaoxi/p/5846416.html
Spring中的Bean什么时候被实例化?
Spring什么时候实例化bean,首先要分2种情况
第一、如果你使用 BeanFactory 作为 Spring Bean 的工厂类,则所有的 Bean 都是在第一次使用该 Bean 的时候实例化
第二、如果你使用 ApplicationContext 作为 Spring Bean 的工厂类,则又分为以下几种情况:
1、如果 bean 的 scope 是 singleton 的,并且 lazy-init 为 false(默认是false,所以可以不用设置),则 ApplicationContext 启动的时候就实例化该 Bean,并且将实例化的 Bean 放在一个 map 结构的缓存中,下次再使用该 Bean 的时候,直接从这个缓存中取。
2、如果 bean 的 scope 是 singleton 的,并且 lazy-init 为 true,则该 Bean 的实例化是在第一次使用该 Bean 的时候进行实例化
3、如果 bean 的 scope 是 prototype 的,则该 Bean 的实例化是在第一次使用该 Bean 的时候进行实例化
BeanFactory接口源码
注意,BeanFactory 只能管理单例(Singleton)Bean 的生命周期。它不能管理原型(prototype,非单例)Bean 的生命周期。这是因为原型 Bean 实例被创建之后便被传给了客户端,容器失去了对它们的引用。
BeanFactory有着庞大的继承、实现体系,有众多的子接口、实现类。
org.springframework.beans.factory.BeanFactory 接口源码:
package org.springframework.beans.factory;

import org.springframework.beans.BeansException;
import org.springframework.core.ResolvableType;
import org.springframework.lang.Nullable;

public interface BeanFactory {

    /**
     * 用来引用一个实例,或把它和工厂产生的Bean区分开,就是说,如果一个FactoryBean的名字为a,那么,&a会得到那个Factory
     */
    String FACTORY_BEAN_PREFIX = "&";

    /*
     * 四个不同形式的getBean方法,获取实例
     */
    Object getBean(String name) throws BeansException;

    <T> T getBean(String name, Class<T> requiredType) throws BeansException;

    <T> T getBean(Class<T> requiredType) throws BeansException;

    Object getBean(String name, Object... args) throws BeansException;

    boolean containsBean(String name); // 是否存在

    boolean isSingleton(String name) throws NoSuchBeanDefinitionException;// 是否为单实例

    boolean isPrototype(String name) throws NoSuchBeanDefinitionException;// 是否为原型(多实例)

    boolean isTypeMatch(String name, Class<?> targetType)
            throws NoSuchBeanDefinitionException;// 名称、类型是否匹配

    Class<?> getType(String name) throws NoSuchBeanDefinitionException; // 获取类型

    String[] getAliases(String name);// 根据实例的名字获取实例的别名

}
ApplicationContext 应用上下文
Spring 通过 应用上下文(ApplicationContext) 装载 Bean 的定义并把它们组装起来。
Spring 为我们提供了多种类型的 ApplicationContext 实现,它们之间主要的区别仅仅在于从哪里加载配置:
AnnotationConfigApplicationContext 从一个或多个基于 java 的配置类中加载上下文定义,适用于 java 注解的方式;
ClassPathXmlApplicationContext 从类路径下的一个或多个 xml 配置文件中加载上下文定义,适用于 xml配置的方式;
FileSystemXmlApplicationContext 从文件系统下的一个或多个 xml 配置文件中加载上下文定义,也就是说系统盘符中加载 xml 配置文件;
AnnotationConfigWebApplicationContext 专门为 web 应用准备的,适用于注解方式;
XmlWebApplicationContext 从web应用下的一个或多个xml配置文件加载上下文定义,适用于xml配置方式。
ApplicationContext 接口源码
package org.springframework.context;

import org.springframework.beans.factory.HierarchicalBeanFactory;
import org.springframework.beans.factory.ListableBeanFactory;
import org.springframework.beans.factory.config.AutowireCapableBeanFactory;
import org.springframework.core.env.EnvironmentCapable;
import org.springframework.core.io.support.ResourcePatternResolver;
import org.springframework.lang.Nullable;

public interface ApplicationContext extends EnvironmentCapable, ListableBeanFactory, HierarchicalBeanFactory,
        MessageSource, ApplicationEventPublisher, ResourcePatternResolver {

    @Nullable
    String getId(); //获取application context唯一id

    String getApplicationName();

    String getDisplayName();

    long getStartupDate();

    @Nullable
    ApplicationContext getParent();

    AutowireCapableBeanFactory getAutowireCapableBeanFactory() throws IllegalStateException;
}
加载 Spring 上下文示例
比如想调用 ras.warning.service.MQPushService 类的 pushMQ() 函数,用 ClassPathXmlApplicationContext 类加载xml配置,然后调用上下文的 getBean() 方法从Spring容器中获取bean,调用其中的方法。
package com.masikkk.service;

import org.springframework.context.ApplicationContext;
import org.springframework.context.support.ClassPathXmlApplicationContext;

import com.masikkk.MQPushService;

public class MQPushServiceTest {
    public static void main(String[] args) {
        ApplicationContext context = new ClassPathXmlApplicationContext(new String[]{"config/applicationContext-warning-push.xml","config/applicationContext-jms-ca.xml"});
        MQPushService pushService = (MQPushService)context.getBean("MQPushService");
        pushService.pushMQ("ca", "本地MQ推送测试", "plf");
    }
}
加载多个配置文件
要想加载多个xml,可以有下面两种方法: 使用一个String数组,将所有要加载的配置文件放入到数组当中:
ApplicationContext ab = new ClassPathXmlApplicationContext(new String[]{"a.xml","b.xml"});
ApplicationContext ab = new ClassPathXmlApplicationContext("classpath:config/applicationContext-*.xml"); // 或者用通配符:
start()
refresh() 扫描所有 Bean 并初始化
AbstractApplicationContext refresh() 过程:
public void refresh() throws BeansException, IllegalStateException {
    synchronized (this.startupShutdownMonitor) {
        // 准备刷新的上下文环境
        prepareRefresh();

        // 初始化 BeanFactory
        ConfigurableListableBeanFactory beanFactory = obtainFreshBeanFactory();

        // Prepare the bean factory for use in this context.
        prepareBeanFactory(beanFactory);

        try {
            // Allows post-processing of the bean factory in context subclasses.
            postProcessBeanFactory(beanFactory);

            // 调用Bean工厂后处理器
            // 扫描Bean文件,并解析成一个个Bean
            // Invoke factory processors registered as beans in the context.
            invokeBeanFactoryPostProcessors(beanFactory);

            // 注册Bean后处理器
            // Register bean processors that intercept bean creation.
            registerBeanPostProcessors(beanFactory);

            // 初始化消息源,不同语言的消息体,国际化处理
            // Initialize message source for this context.
            initMessageSource();

            // 初始化应用上下文时间广播器
            // Initialize event multicaster for this context.
            initApplicationEventMulticaster();

            // 初始化其他特殊的Bean,由具体子类实现
            // Initialize other special beans in specific context subclasses.
            onRefresh();

            // 注册事件监听器,在所有注册的bean中查找Listener bean,注册到消息广播器中
            // Check for listener beans and register them.
            registerListeners();

            // 初始化所有单例的Bean,使用懒加载模式的Bean除外
            // Instantiate all remaining (non-lazy-init) singletons.
            finishBeanFactoryInitialization(beanFactory);

            // 完成刷新并发布容器刷新事件,通知生命周期处理器lifecycleProcessor刷新过程,同时发出ContextRefreshEvent通知别人
            // Last step: publish corresponding event.
            finishRefresh();
        }
        ...
    }
}
其中的 finishBeanFactoryInitialization() 负责 beanFactory 的初始化,包括所有非lazy-init的单例bean的初始化:
/**
 * Finish the initialization of this context's bean factory,
 * initializing all remaining singleton beans.
 */
protected void finishBeanFactoryInitialization(ConfigurableListableBeanFactory beanFactory) {
  // Initialize conversion service for this context.
  if (beanFactory.containsBean(CONVERSION_SERVICE_BEAN_NAME) &&
      beanFactory.isTypeMatch(CONVERSION_SERVICE_BEAN_NAME, ConversionService.class)) {
    beanFactory.setConversionService(
        beanFactory.getBean(CONVERSION_SERVICE_BEAN_NAME, ConversionService.class));
  }

  // Register a default embedded value resolver if no bean post-processor
  // (such as a PropertyPlaceholderConfigurer bean) registered any before:
  // at this point, primarily for resolution in annotation attribute values.
  if (!beanFactory.hasEmbeddedValueResolver()) {
    beanFactory.addEmbeddedValueResolver(new StringValueResolver() {
      @Override
      public String resolveStringValue(String strVal) {
        return getEnvironment().resolvePlaceholders(strVal);
      }
    });
  }

  // Initialize LoadTimeWeaverAware beans early to allow for registering their transformers early.
  String[] weaverAwareNames = beanFactory.getBeanNamesForType(LoadTimeWeaverAware.class, false, false);
  for (String weaverAwareName : weaverAwareNames) {
    getBean(weaverAwareName);
  }

  // Stop using the temporary ClassLoader for type matching.
  beanFactory.setTempClassLoader(null);

  // Allow for caching all bean definition metadata, not expecting further changes.
  beanFactory.freezeConfiguration();

  // 初始化所有非 lazy-init 的单例bean
  // Instantiate all remaining (non-lazy-init) singletons.
  beanFactory.preInstantiateSingletons();
}
最后一步,org.springframework.beans.factory.support.DefaultListableBeanFactory#preInstantiateSingletons 进行 bean 的初始化, 该方法首先循环所有的BeanNames,并且调用getBean方法,该方法实际上就是创建bean并递归构建依赖关系。
getBean会调用org.springframework.beans.factory.support.AbstractBeanFactory#doGetBean 进行最终的 bean 初始化,这也就到了原生 Spring 的初始化过程,里面有一些处理循环依赖的逻辑。
@Override
public void preInstantiateSingletons() throws BeansException {
  if (logger.isDebugEnabled()) {
    logger.debug("Pre-instantiating singletons in " + this);
  }

  // Iterate over a copy to allow for init methods which in turn register new bean definitions.
  // While this may not be part of the regular factory bootstrap, it does otherwise work fine.
  List<String> beanNames = new ArrayList<String>(this.beanDefinitionNames);

  // Trigger initialization of all non-lazy singleton beans...
  for (String beanName : beanNames) {
    RootBeanDefinition bd = getMergedLocalBeanDefinition(beanName);
    if (!bd.isAbstract() && bd.isSingleton() && !bd.isLazyInit()) {
      if (isFactoryBean(beanName)) {
        final FactoryBean<?> factory = (FactoryBean<?>) getBean(FACTORY_BEAN_PREFIX + beanName);
        boolean isEagerInit;
        if (System.getSecurityManager() != null && factory instanceof SmartFactoryBean) {
          isEagerInit = AccessController.doPrivileged(new PrivilegedAction<Boolean>() {
            @Override
            public Boolean run() {
              return ((SmartFactoryBean<?>) factory).isEagerInit();
            }
          }, getAccessControlContext());
        }
        else {
          isEagerInit = (factory instanceof SmartFactoryBean &&
              ((SmartFactoryBean<?>) factory).isEagerInit());
        }
        if (isEagerInit) {
          getBean(beanName);
        }
      }
      else {
        getBean(beanName);
      }
    }
  }

  // Trigger post-initialization callback for all applicable beans...
  for (String beanName : beanNames) {
    Object singletonInstance = getSingleton(beanName);
    if (singletonInstance instanceof SmartInitializingSingleton) {
      final SmartInitializingSingleton smartSingleton = (SmartInitializingSingleton) singletonInstance;
      if (System.getSecurityManager() != null) {
        AccessController.doPrivileged(new PrivilegedAction<Object>() {
          @Override
          public Object run() {
            smartSingleton.afterSingletonsInstantiated();
            return null;
          }
        }, getAccessControlContext());
      }
      else {
        smartSingleton.afterSingletonsInstantiated();
      }
    }
  }
}
SpringBoot源码之旅——IoC容器 https://zhuanlan.zhihu.com/p/54578816
stop()
ApplicationContext.getBean() 调用过程
Spring Boot 中
从前往后的调用栈
ApplicationContext.getBean(String name); AbstractApplicationContext.getBean(String name); AbstractBeanFactory.getBean(String name);
doGetBean(name, (Class)null, (Object[])null, false);
AbstractBeanFactory.doGetBean(String name, @Nullable Class<T> requiredType, @Nullable Object[] args, boolean typeCheckOnly);
DefaultSingletonBeanRegistry.getSingleton(String beanName); getSingleton(beanName, true); DefaultSingletonBeanRegistry.getSingleton(String beanName, boolean allowEarlyReference);
DefaultSingletonBeanRegistry 中有一个 单例 bean 的 map, getSingleton 就是根据 bean name 从这个 map 中获取的.
private final Map<String, Object> singletonObjects = new ConcurrentHashMap<>(256);
@Bean 注解
Spring的@Bean注解用于告诉方法,产生一个Bean对象,然后这个Bean对象交给Spring管理。产生这个Bean对象的方法Spring只会调用一次,随后这个Spring将会将这个Bean对象放在自己的IOC容器中。
默认bean的名称就是其方法名。但是也可以指定名称@Bean(name="BeanTest")。
package org.springframework.context.annotation;

import java.lang.annotation.Documented;
import java.lang.annotation.ElementType;
import java.lang.annotation.Retention;
import java.lang.annotation.RetentionPolicy;
import java.lang.annotation.Target;
import org.springframework.beans.factory.annotation.Autowire;
import org.springframework.core.annotation.AliasFor;

@Target({ElementType.METHOD, ElementType.ANNOTATION_TYPE})
@Retention(RetentionPolicy.RUNTIME)
@Documented
public @interface Bean {
    @AliasFor("name")
    String[] value() default {};

    @AliasFor("value")
    String[] name() default {};

    Autowire autowire() default Autowire.NO;

    String initMethod() default "";

    String destroyMethod() default "(inferred)";
}
name -- 指定一个或者多个 Bean 的名字。这等价于 XML 配置中 的 name 属性。
initMethod -- 容器在初始化完 Bean 之后,会调用该属性指定的方法。这等价于 XML 配置中 的 init-method 属性。
destroyMethod -- 该属性与 initMethod 功能相似,在容器销毁 Bean 之前,会调用该属性指定的方法。这等价于 XML 配置中 的 destroy-method 属性。
autowire -- 指定 Bean 属性的自动装配策略,取值是 Autowire 类型的三个静态属性。Autowire.BY_NAME,Autowire.BY_TYPE,Autowire.NO。与 XML 配置中的 autowire 属性的取值相比,这里少了 constructor,这是因为 constructor 在这里已经没有意义了。
@Bean 没有直接提供指定作用域的属性,可以通过 @Scope 来实现该功能
@Bean 注解,@Bean注解会告诉Spring这个方法将会返回一个对象,该对象要注册为Spring应用上下文中的bean
默认情况下,bean的ID与带有@Bean注解的方法名是一样的。如果你想为其设置成一个不同的名字的话,可以通过name属性指定一个不同的名字:
@Bean(name="lonelyHeartsClubBand")
public CompactDisc sgtPeppers() {
  return new SgtPeppers();
}
@Configuration 注解
@Configuration 注解告知 Spring 容器这个类是一个拥有 bean 定义和依赖项的配置类。
我们通常将用于存放配置信息的类的类名以 Config 结尾,比如 AppDaoConfig.java, AppServiceConfig.java 等等。我们需要在用于指定配置信息的类上加上 @Configuration 注解,以明确指出该类是 Bean 配置的信息源。并且 Spring 对标注 Configuration 的类有如下要求:
配置类不能是 final 的;
配置类不能是本地化的,亦即不能将配置类定义在其他类的方法内部;
配置类必须有一个无参构造函数。
AnnotationConfigApplicationContext 将配置类中标注了 @Bean 的方法的返回值识别为 Spring Bean,并注册到容器中,受 IoC 容器管理。@Bean 的作用等价于 XML 配置中的 标签。示例如下:
@Configuration
public class BookStoreDaoConfig{
  @Bean
  public UserDao userDao(){
    return new UserDaoImpl();
  }

  @Bean
  public BookDao bookDao(){
    return new BookDaoImpl();
  }
}
Spring 在解析到以上文件时,将识别出标注 @Bean 的所有方法,执行之,并将方法的返回值 ( 这里是 UserDaoImpl 和 BookDaoImpl 对象 ) 注册到 IoC 容器中。默认情况下,Bean 的名字即为方法名。
需要注意的是,AnnotationConfigApplicationContext 在解析配置类时,会将配置类自身注册为一个 Bean,因为 @Configuration 注解本身定义时被 @Component 标注了。因此可以说,一个 @Configuration 同时也是一个 @Component。
@Import 注解
通常不会在一个 @Configuration 类中配置所有的 bean
常用的做法是,把不同类型的配置放到不同的 @Configuration 中,再弄个总的 @Configuration 配置,在其中 @import 其他配置类。
@Import 注解就是干这个用的。
4.3. Aggregating @Configuration classes with @Import https://docs.spring.io/spring-javaconfig/docs/1.0.0.M4/reference/html/ch04s03.html
Spring @Import Annotation https://www.baeldung.com/spring-import-annotation
@Import 所在的类会成为bean
下面 ClassA 会成为 Bean,而 ClassB 不会成为一个 bean
@Import(ClassB.class)
public class ClassA {

}
@Component 注解
@Component把普通pojo实例化到spring容器中,相当于配置文件中的<bean id="" class=""/>
如果@Component不指定其value,则默认的bean名字为这个类的类名首字母小写,如果指定value @Component(value="UserAction")或者@Component("UserAction"),则使用value作为bean的名字。
如何开启自动扫描:
<context:component-scan base-package="xxx" />
spring会自动扫描xxx路径下的注解。
或者Spring Boot 中使用 @ComponentScan 注解开启
@Component泛指组件,当组件不好归类的时候,我们可以使用这个注解进行标注。
- @Service用于标注业务层组件、
- @Controller用于标注控制层组件(如struts中的action)
- @Repository用于标注数据访问组件,即DAO组件。
Spring 2.5 中除了提供 @Component 注释外,还定义了几个拥有特殊语义的注释,它们分别是: @Repository、 @Service 和 @Controller。在目前的 Spring 版本中,这 3 个注释和 @Component 是等效的,但是从注释类的命名上,很容易看出这 3 个注释分别和持久层、业务层和控制层(Web 层)相对应。虽然目前这 3 个注释和 @Component 相比没有什么新意,但 Spring 将在以后的版本中为它们添加特殊的功能。所以,如果 Web 应用程序采用了经典的三层分层结构的话,最好在持久层、业务层和控制层分别采用 @Repository、@Service 和 @Controller 对分层中的类进行注释,而用 @Component 对那些比较中立的类进行注释。
@Service用于标注业务层组件、 @Controller用于标注控制层组件(如struts中的action) @Repository用于标注数据访问组件,即DAO组件。 @Component泛指组件,当组件不好归类的时候,我们可以使用这个注解进行标注。
@Service
例如:
package com.spring.model;

import org.springframework.beans.factory.annotation.Autowired;
import org.springframework.stereotype.Service;

@Service
public class Zoo {

    @Autowired
    private Tiger tiger;

    @Autowired
    private Monkey monkey;

    public String toString(){
        return tiger + "\n" + monkey;
    }

}
这样,Zoo.java在Spring容器中存在的形式就是"zoo",即可以通过ApplicationContext的getBean("zoo")方法来得到Zoo.java。@Service注解,其实做了两件事情: (1)、声明Zoo.java是一个bean,这点很重要,因为Zoo.java是一个bean,其他的类才可以使用@Autowired将Zoo作为一个成员变量自动注入。 (2)、Zoo.java在bean中的id是"zoo",即类名且首字母小写。 如果,我不想用这种形式怎么办,就想让Zoo.java在Spring容器中的名字叫做"Zoo",可以的:@Service("Zoo")
@Controller
@Controller对应表现层的Bean,也就是Action,例如:
使用@Controller注解标识UserAction之后,就表示要把UserAction交给Spring容器管理,在Spring容器中会存在一个名字为"userAction"的action,这个名字是根据UserAction类名来取的。注意:如果@Controller不指定其value【@Controller】,则默认的bean名字为这个类的类名首字母小写,如果指定value【@Controller(value="UserAction")】或者【@Controller("UserAction")】,则使用value作为bean的名字。
这里的UserAction还使用了@Scope注解,@Scope("prototype")表示将Action的范围声明为原型,可以利用容器的scope="prototype"来保证每一个请求有一个单独的Action来处理,避免struts中Action的线程安全问题。spring 默认scope 是单例模式(scope="singleton"),这样只会创建一个Action对象,每次访问都是同一Action对象,数据不安全,struts2 是要求每次次访问都对应不同的Action,scope="prototype" 可以保证当有请求的时候都创建一个Action对象。
@Repository
@Scope(Spring中bean的作用域)
在 Spring IoC 容器中具有以下几种作用域:基本作用域(singleton、prototype),Web 作用域(reqeust、session、globalsession),自定义作用域。
singleton:单例模式,在整个Spring IoC容器中,使用singleton定义的Bean将只有一个实例 prototype:原型模式,每次通过容器的getBean方法获取prototype定义的Bean时,都将产生一个新的Bean实例 request:对于每次HTTP请求,使用request定义的Bean都将产生一个新实例,即每次HTTP请求将会产生不同的Bean实例。只有在Web应用中使用Spring时,该作用域才有效 session:对于每次HTTP Session,使用session定义的Bean都将产生一个新实例。同样只有在Web应用中使用Spring时,该作用域才有效 global-session:global-session和Portlet应用相关。当你的应用部署在Portlet容器中工作时,它包含很多portlet。如果你想要声明让所有的portlet共用全局的存储变量的话,那么这全局变量需要存储在global-session中。
默认是单例模式,即scope="singleton"。 另外scope还有prototype、request、session、global session作用域。 scope="prototype"多例 1.singleton单例模式,全局有且仅有一个实例 2.prototype原型模式,每次获取Bean的时候会有一个新的实例
如果想声明成多例 用
@Component
@Scope("prototype")
public class ServiceA{

}
@ComponentScan
我们可以通过 basePackages 等属性来细粒度的定制 @ComponentScan 自动扫描的范围,如果不指定,则默认Spring框架实现会从声明 @ComponentScan 所在类的package进行扫描。
所以SpringBoot的启动类最好是放在root package下,因为默认不指定basePackages
Spring Boot Service Config配置实例
package com.masikkk.common.config;

import java.util.concurrent.ExecutorService;
import java.util.concurrent.Executors;
import org.mybatis.spring.annotation.MapperScan;
import org.springframework.context.annotation.Bean;
import org.springframework.context.annotation.ComponentScan;
import org.springframework.context.annotation.Configuration;
import org.springframework.context.annotation.Import;

// spring boot service 通用配置文件
@Import({
        MariadbConfig.class,
        FalconConfig.class,
        SpringMvcConfig.class,
        CacheConfig.class,
        CuratorConfig.class
})
@ComponentScan(basePackages = {
        "com.masikkk.common.service",
        "com.masikkk.common.aspect",
        "com.masikkk.common.web",
        "com.masikkk.common.falcon",
        "com.masikkk.common.redis",
        "com.masikkk.common.lock",
        "com.masikkk.common.biz",
        "com.masikkk.common.dao",
        "com.masikkk.common.kafka"
})
@MapperScan({
        "com.masikkk.mariadb.mapper",
        "com.masikkk.common.mapper"
})
@Configuration
public class ServiceConfig {
    @Bean("commonCachedThreadPool")
    public ExecutorService executorService() {
        return Executors.newCachedThreadPool();
    }
}
ComponentScan注解源码
package org.springframework.context.annotation;

import java.lang.annotation.Documented;
import java.lang.annotation.ElementType;
import java.lang.annotation.Repeatable;
import java.lang.annotation.Retention;
import java.lang.annotation.RetentionPolicy;
import java.lang.annotation.Target;

import org.springframework.beans.factory.support.BeanNameGenerator;
import org.springframework.core.annotation.AliasFor;
import org.springframework.core.type.filter.TypeFilter;

@Retention(RetentionPolicy.RUNTIME)
@Target(ElementType.TYPE)
@Documented
@Repeatable(ComponentScans.class)
public @interface ComponentScan {
    @AliasFor("basePackages")
    String[] value() default {};

    @AliasFor("value")
    String[] basePackages() default {};

    Class<?>[] basePackageClasses() default {};

    Class<? extends BeanNameGenerator> nameGenerator() default BeanNameGenerator.class;

    Class<? extends ScopeMetadataResolver> scopeResolver() default AnnotationScopeMetadataResolver.class;

    ScopedProxyMode scopedProxy() default ScopedProxyMode.DEFAULT;

    String resourcePattern() default ClassPathScanningCandidateComponentProvider.DEFAULT_RESOURCE_PATTERN;

    boolean useDefaultFilters() default true;

    Filter[] includeFilters() default {};

    Filter[] excludeFilters() default {};

    boolean lazyInit() default false;

    @Retention(RetentionPolicy.RUNTIME)
    @Target({})
    @interface Filter {

        FilterType type() default FilterType.ANNOTATION;

        @AliasFor("classes")
        Class<?>[] value() default {};

        @AliasFor("value")
        Class<?>[] classes() default {};

        String[] pattern() default {};
    }
}
The prefix“context”for element“context:component-scan”is not bound
错误:The prefix“context”for element“context:component-scan”is not bound
原因:没有配置context命名空间以及spring-context模式文档
解决:
在<beans >中增加xmlns:context命名空间及spring-context模式文档配置
<beans xmlns:context="http://www.springframework.org/schema/context"
xsi:schemaLocation="http://www.springframework.org/schema/context
       http://www.springframework.org/schema/context/spring-context-3.0.xsd">
Spring 中的各种 Aware 接口
Spring 中有一个 Aware 接口,是所有 xxxAware 接口的父接口,例如 ApplicationContextAware ,用于标识这是一类通知类接口,或者叫感知类接口。
xxxAware 意思就是说通过实现这个接口,能感知前面的 xxx 事件,这个 xxx 事件是来自于 Spring 容器的。
Spring 中 Aware 接口的目的是为了能够感知容器、Bean 初始化过程中的各个阶段,本来是为了 Spring 内部自己使用的,当需要深度定制功能时,可以实现这些 Aware 接口,实现到达 Spring 容器某个阶段的时候获得通知,来进行操作。
通过实现 Spring 的 Aware 接口,可以实现在 Spring 上下文初始化过程中或完成后取得一些相对应的资源。
常用 Aware 接口
BeanFactoryAware 实现了 BeanFactoryAware 接口的类,能够获取到 BeanFactory 对象
ApplicationContextAware 实现了 ApplicationContextAware 接口的类,能够获取到 ApplicationContext
BeanNameAware 获取容器中 Bean 的名称
MessageSourceAware 获取 Message Source 相关文本信息
ApplicationEventPublisherAware 应用事件发布器,可以发布事件
ResourceLoaderAware 获得资源加载器,可以获得外部资源文件
EmbeddedValueResolverAware 配置解析器,用于读取 Spring properties 或 yaml 配置文件
一般使用方式是:
把实现这些 Aware 接口的 Bean 本身也注册到 Spring 上下文之中,通过在 application.xml 文件中定义对应的 bean 标签,或者使用 @Component 标注,然后等这些实现 Aware 接口的 Bean 在被初始之后,Spring 会调用对应的 set 回调方法,就可以在其中取得一些相对应的资源。
例如
实现 BeanFactoryAware 的 Bean 在初始后,Spring 会回调 setBeanFactory() 注入 BeanFactory 的实例
实现 ApplicationContextAware 的 Bean,Spring 会回调 setApplicationContext() 注入 ApplicationContext 的实例
BeanNameAware实例
实现 BeanNameAware 接口,可以让该 Bean 感知到自身的 BeanName(对应 Spring 容器的 BeanId 属性)属性。
例如定义一个实现了 BeanNameAware 的 Bean,用内部属性 beanName 保存回调的 name
@Data
@Component
public class NameAwareBean implements BeanNameAware {
    private String beanName;
    private String grade;
    private int age;

    @Override
    public void setBeanName(String name) {
        this.beanName = name;
    }
}
写一个测试类,启动 Spring 上下文
@RunWith(SpringRunner.class)
@SpringBootTest(classes = TestApplication.class)
public class SpringAwareTest {
    @Test
    public void testBeanNameAware() {
        NameAwareBean nameAwareBean = ApplicationContextProvider.getBean(NameAwareBean.class);
        System.out.println(JSONUtils.writeValue(nameAwareBean));
    }
}
结果:
{"beanName":"nameAwareBean","grade":null,"age":0}
可以看到这个 bean 里已经有了 beanName 属性,也就是感知到了 Spring 上下文中自己的 beanId,其实是 Spring 上下文初始化完成后回调了一下 setBeanName() 来通知给这个 Bean 的。
ApplicationContextAware
实现 ApplicationContextAware 的 Bean,Spring 会回调 setApplicationContext() 注入 ApplicationContext 的实例
ApplicationContextAware 接口源码
ApplicationContextAware 接口源码如下:
package org.springframework.context;

import org.springframework.beans.BeansException;
import org.springframework.beans.factory.Aware;

public interface ApplicationContextAware extends Aware {

    /**
     * Set the ApplicationContext that this object runs in.
     * Normally this call will be used to initialize the object.
     * <p>Invoked after population of normal bean properties but before an init callback such
     * as {@link org.springframework.beans.factory.InitializingBean#afterPropertiesSet()}
     * or a custom init-method. Invoked after {@link ResourceLoaderAware#setResourceLoader},
     * {@link ApplicationEventPublisherAware#setApplicationEventPublisher} and
     * {@link MessageSourceAware}, if applicable.
     * @param applicationContext the ApplicationContext object to be used by this object
     * @throws ApplicationContextException in case of context initialization errors
     * @throws BeansException if thrown by application context methods
     * @see org.springframework.beans.factory.BeanInitializationException
     */
    void setApplicationContext(ApplicationContext applicationContext) throws BeansException;
}
setApplicationContext的回调时机(属性设置后afterPropertiesSet()之前)
Bean 属性设置之后(当然此时Bean也实例化完成了), InitializingBean#afterPropertiesSet() 或 init-method 方法被调用之前。
并且在下面这三个 Aware 回调之后
ResourceLoaderAware#setResourceLoader
ApplicationEventPublisherAware#setApplicationEventPublisher
MessageSourceAware
通过实现 ApplicationContextAware 获取 ApplicationContext
获取 ApplicationContext 的方法有多种,推荐通过实现 ApplicationContextAware 接口来实现。
实现方式:
实现 ApplicationContextAware 接口,在其中实现 setApplicationContext() 方法,并用一个 ApplicationContext 静态变量保存 Spring 回调传过来的 ApplicationContext 实例。
创建一个实体类并实现 ApplicationContextAware 接口,重写接口内的 setApplicationContext 方法来完成获取 ApplicationContext 实例的方法, Bean 在实例化时会自动调用 setApplicationContext() 方法
例如:
@Component
public class ApplicationContextProvider implements ApplicationContextAware {
    /**
     * 上下文对象实例
     */
    private static ApplicationContext applicationContext;

    @Override
    public void setApplicationContext(ApplicationContext applicationContext) throws BeansException {
        this.applicationContext = applicationContext;
    }

    /**
     * 获取applicationContext
     * @return
     */
    public static ApplicationContext getApplicationContext() {
        return applicationContext;
    }

    /**
     * 通过name获取 Bean.
     * @param name
     * @return
     */
    public static Object getBean(String name){
        return getApplicationContext().getBean(name);
    }

    /**
     * 通过class获取Bean.
     * @param clazz
     * @param <T>
     * @return
     */
    public static <T> T getBean(Class<T> clazz){
        return getApplicationContext().getBean(clazz);
    }

    /**
     * 通过name,以及Clazz返回指定的Bean
     * @param name
     * @param clazz
     * @param <T>
     * @return
     */
    public static <T> T getBean(String name, Class<T> clazz){
        return getApplicationContext().getBean(name, clazz);
    }
}
cn.hutool.extra.spring.SpringUtil
hutool 中的 SpringUtil 实现了 ApplicationContextAware,而且开启了自动配置,可直接使用。
getBeansOfType() 获取接口的所有实现类Bean实例
调用全部子类的某个方法
遍历接口 StatisticHandler 的所有实现类,调用所有实现类的 save() 方法。
@Slf4j
@Service
public class StatisticPersistenceService implements ApplicationContextAware {
    private Map<String, StatisticHandler> statisticHandlerMap;

    @Override
    public void setApplicationContext(ApplicationContext applicationContext) throws BeansException {
        statisticHandlerMap = applicationContext.getBeansOfType(StatisticHandler.class);
        log.info("统计指标Handler列表 {}", statisticHandlerMap.keySet());
    }

    /**
     * 持久化所有统计指标
     */
    public void executeStatisticPersistence() {
        statisticHandlerMap.forEach((key, value) -> {
            log.info("持久化 {}", key);
            value.save();
        });
    }
}
从所有子类中找出实现了指定泛型参数的子类
ApplicationContext.getBeansOfType 把全部实现类都找到,用 getUltimateTargetObject 解封代理(否则父类是代理),用 ResolvableType.forClass().getSuperType.getGenerics() 获取父类的泛型参数匹配筛选即可。
有多个 mybatis-plus ServiceImpl 的子类,比如:
@Service
public class ArticleMyBatisServiceImpl extends ServiceImpl<ArticleMapper, ArticleDO> implements ArticleMyBatisService {
}

@Service
public class UserMyBatisServiceImpl extends ServiceImpl<UserMapper, UserDO> implements UserMyBatisService {
}
想找到 UserDO 对应的实现类,调用其方法,实现如下:
@Test
public void getSpecificSubClass() {
    SpringUtil.getBeansOfType(ServiceImpl.class).values().stream().filter(bean -> {
        Object unwrapBean = AopTestUtils.getUltimateTargetObject(bean);
        ResolvableType resolvableType = ResolvableType.forClass(unwrapBean.getClass());
        return Arrays.stream(resolvableType.getSuperType().getGenerics()).anyMatch(
                generic -> generic.isAssignableFrom(UserDO.class));
    }).findFirst().ifPresent(
            subClass -> {
                log.info("子类 {} 父类 {}", subClass,
                        AopTestUtils.getUltimateTargetObject(subClass).getClass().getGenericSuperclass());
                log.info("{}", ((ServiceImpl) subClass).list());
            }
    );
}
获取当前的Spring Active Profile
@Component
public class SpringContextUtils implements ApplicationContextAware {
    private static ApplicationContext applicationContext;

    @Override
    public void setApplicationContext(ApplicationContext applicationContext) throws BeansException {
        SpringContextUtils.applicationContext = applicationContext;
    }

    public static String getActiveProfile() {
        return applicationContext.getEnvironment().getActiveProfiles()[0];
    }

    public static boolean isProd() {
        return "prod".equals(applicationContext.getEnvironment().getActiveProfiles()[0]);
    }
}
EmbeddedValueResolverAware 读取配置文件
通过 EmbeddedValueResolverAware 可以读取 Spring 的 properties 或 yaml 配置文件。
@Component
public class SpringAware implements EmbeddedValueResolverAware {
    private StringValueResolver resolver;

    @Override
    public void setEmbeddedValueResolver(StringValueResolver resolver) {
        this.resolver = resolver;
        String appName = resolver.resolveStringValue("${app.name}");
        String add = resolver.resolveStringValue("#{1*1}");
        System.err.println(appName);
        System.err.println(add);
    }
}
EnvironmentAware 配置文件解析
@Slf4j
@SpringBootTest
public class EnvironmentAwareTest {
    @Test
    public void testResolve() {
        log.info("{}", EnvironmentAwareClass.resolveHolder("${spring.application.name: defaultAppName}"));
    }

    @Component
    public static class EnvironmentAwareClass implements EnvironmentAware {
        private static Environment environment;

        @Override
        public void setEnvironment(Environment environment) {
            this.environment = environment;
        }

        public static String resolveHolder(String holder) {
            return environment.resolvePlaceholders(holder);
        }
    }
}
Bean 装配
spring容器提供了三种主要的装配机制: 在XML中进行显式配置。 在Java Config文件中进行显式配置。 隐式的bean发现机制和自动装配。
@Autowired 注解按类型匹配
@Autowired 顾名思义,就是自动装配,其作用是为了消除代码Java代码里面的getter/setter与bean属性中的property。当然,getter看个人需求,如果私有属性需要对外提供的话,应当予以保留。
@Autowired 默认按类型匹配的方式,在容器查找匹配的Bean,当有且仅有一个匹配的Bean时,Spring将其注入@Autowired标注的变量中。
@Autowired 默认按类型装配,如果我们想使用按名称装配,可以结合@Qualifier注解一起使用。如下: @Autowired @Qualifier("beanName") 存在多个实例配合使用
field注入
在属性上使用 @Autowired 注解,Spring 便会按类型寻找相匹配的 bean 进行自动注入。 这是开发中最常见的注入方式,但并不是 Spring 官方推荐的注入方式。
@Autowired 注入Bean集合(List/Map)
如下有两个 MyInterface 接口的实现类,可以通过 @Autowired 一次性将其注入到 List 或 Map 集合中: 实现类中可以增加 @Order(value) 注解,值越小越先被初始化,越先被放入 List
public class MyClass1 implements MyInterface {
}
public class MyClass2 implements MyInterface {
}

public class MyService {
    @Autowired
    private List<MyInterface> list;

    @Autowired
    private Map<String, MyInterface> map;
}
setter方法注入
在 setter 方法上使用 @Autowired 进行注入。当Spring发现使用setter方法的 @Autowired 注释时,它会尝试在方法上执行 autowire="byType" 的自动连接。 在 Spring3.x 刚推出的时候,推荐使用 setter 注入的方式。 setter 注入的好处是,可以在方法内对注入的入参做一些处理,例如下面注入 processors 列表,转换为 Map 存储到 processorMap 字段上。
@Service
public class ProcessorManager {
    private Map<TypeEnum, Processor> processorMap;

    @Autowired
    public void injectProcessor(List<Processor> processors) {
        processorMap = Maps.uniqueIndex(processors, Processor::type);
    }
}
构造器注入
将 @Autowired 应用于构造函数。构造函数 @Autowired 注解表示构造函数在创建bean时应该是自动连线的。 从 Spring4.x 起,官方又开始推荐构造器注入的方式。
构造器注入示例:
@Component
public class FarewellService {
    private final Translator translator;

    public FarewellService(Translator translator) {
        this.translator = translator;
    }

    public String produce() {
        return translator.translate("bye");
    }
}
如果不了解 Spring 的构造器注入,看上面的代码可能会感觉疑惑:
1、translator 属性上并没有 @Autowired, 他的值是在什么时候注入的呢?
构造器注入
2、就算有构造器注入,构造函数上并没有 @Autowired 注解啊,也能自动注入吗? 由于只有一个构造方法,Spring 可以唯一选择这个构造方法来初始化 FarewellService 并自动注入 Translator 实例,不需要显示的加 @Autowired 来指定选用哪个构造方法。
构造方法的选择
总的来说,Spring的构造方法,总体分两类,第一类是普通的构造函数,第二类则是有 @Autowired 注解的构造函数。
使用构造函数本身去初始化bean的情况多种多样,且面对不同情况,Spring构造方法的选择情况如下: 一、在构造函数没有被 @Autowired 注解的情况下,具体情况大致分为: 1、只有一个无参构造函数。 2、只有一个含参构造函数。 3、有若干个构造函数,但是包含一个无参构造函数。 4、有若干个构造函数,但是不包括一个无参构造函数。
总体上来说,对于上面的四种情况处理的非常简单。当Spring只有一个构造函数的时候,将会直接使用这个构造函数来进行初始化。无论这个构造函数究竟是含参的还是不含参的,但是对于含参的构造函数来说,构造器所依赖的必须要被满足。
在有多个构造函数的情况下,也非常简单,如果构造函数中有无参构造函数,那么使用无参构造函数进行初始化。如果有若干个构造函数,但是不包括一个无参构造函数,那么Spring将会直接抛出异常,提示用户该bean无法实例化,需要用户指明Spring要选用哪一个构造方法,或者选用哪几个构造方法。指明选用的构造器的方法也很简单,在构造器上加上 @Autowired 表明你希望Spring使用这个构造器来进行初始化构造。
二、在构造函数被 @Autowired 注解的情况下, @Autowired 可以通过 true, false 来设置强依赖或者弱依赖,具体情况大致分为: 1、只有一个 @Autowired 修饰的构造函数。 2、有多于一个 @Autowired 或修饰的构造函数。
对于第一种情况,非常的简单,如果使用 @Autowired 注解了这个构造器,那么将会使用这个构造器进行构造。在 @Autowired 的 required 属性为 true 的使用,强制使用这个构造函数。如果 required 属性为 false 的话,那么在这个构造函数所需要的参数不被满足的情况下,如果有默认的无参构造函数,Spring还会调用默认的无参构造函数来进行初始化。如果没有默认的无参构造函数,那么非常抱歉,将会抛出异常。
如果有多个 @Autowired 注解的构造函数,如果这里面存在 required=true 的构造函数,那么将会直接抛出异常。如果有 @Autowired(required=true) 注解构造函数,那么这个bean有且只能有这一个被@Autowired注解的构造函数。如果有多个,无论其它的是不是@Autowired(required=false),都会被认作是多余的,将直接抛出异常。
如果Spring发现了一个bean有多个 @Autowired(required=false) 修饰的构造函数。那么Spring将会在创建一个构造器的候选列表,通过在这个列表中进行筛选,选择Spring认为最合适的构造方法。如果该类中还有一个默认的构造函数,那么还会将这个默认的构造函数放入到构造器的候选列表当中去,以防在所有的 @Autowired 都没有被满足的情况下,仍旧能够使用默认的无参构造函数进行构造。
Spring对Kotlin进行了特别的处理,在Kotlin中还有首选构造函数。如果Spring发现了Kotlin中的首选构造函数,还会根据首选构造函数进行一些处理,大致和无参构造函数类似。
差异度算法
在有多个 @Autowired(required=false) 的时候,Spring 采用差异度算法,会对这些构造器进行特别的处理。
Spring 针对多个 @Autowired(required=false) 进行选择时所采取的算法: Spring 在面对多个构造函数的时候,首先会对这些构造函数根据参数的个数和权限的大小(“public default protected private”)进行排序。然后按照先后顺序进行处理。(先差异度,后顺序)
Spring对多个构造函数,采用差异度的大小来进行排序,然后选择差异度最小的那个构造函数进行初始化。如果有多个差异度相同的构造函数,那么按照处理的顺序,采用最小差异度中第一个被处理的构造函数。
计算差异度的方法其实也不难。
首先,要被注入的构造函数,它们所需的参数必须存在于Spring的容器当中。如果连这个都不满足,那么这个构造函数将会被直接PASS。
然后,对构造函数进行循环处理。对于每一个构造函数。首先根据具体情况,从容器中将能够满足它们的依赖全部取出来。假设有一个构造函数是 public Constructor(java.lang.Number);。而Spring容器中又正好存在java.lang.Float,java.lang.Integer这两个bean,Spring将会将这两个bean提取出来,与之进行匹配。在匹配的时候,Spring将会使用继承层次树上最近的那一个进行匹配。
比如说构造器是public Constructor(java.lang.Object),而Spring容器中又正好有java.lang.Object,java.lang.String,java.lang.Integer三个bean,那么将使用java.bean来进行匹配。当一个函数的所有需要的参数都被提取出来的时候,开始对这个构造器进行差异度的计算。
差异度的计算方法依旧是根据继承关系来进行的。对于每一个构造器,其构造函数有若干个参数,假设它们的类型分别为(ClazzA,ClazzB,ClazzC...)。而参数的类型分别是(ParamA,ParamB,ParamC...)。首先可以确定的是,经过了层层的淘汰与计算。对于剩下的构造器,它们的构造函数参数都是可以满足的。但是类型未必是完全匹配的。比如说,需要的构造函数是(Object,Object,Object),而实际传入的参数可能是(Integer,Float,String)。那么原来的构造函数和实际情况是有一定的差异的,Spring将这个差异通过一个数字来表示,我们称之为差异度指数。
对于Spring现在所可以选用的构造器。通过计算,每一个构造器的可以产生一个差异度指数。Spring将会选择差异度指数最小的构造函数,如果有多个差异度相同的构造函数,那么选择在列表中的第一个(即前面所说的第一个处理的构造器函数)。
对于任意一个构造器函数,其具有n个参数。对于第i个声明的参数,我们假设分别为Ci,而具体传入的参数,我们则认为是Pi。然后Spring会计算出Pi所对应的类型,与实际Ci的类型的继承关系,来产生一个差异度。最后将这个构造器的n个参数的差异度全部求和,得到这个构造器的总体差异度。差异度的计算算法很简单。继承每经过一个层,差异度将会增加2。比如实际需要的参数是Object,而传入的参数是Float,那么它们的差异度则是4。因为Float继承了Number,而Number则继承了Object,所以从Float到Object,一共经历了两层继承。每一层继承会带来数量为2的差异度,两层继承,那么差异度则为4。如果参数是一个接口的话,那么差异度还会额外增加1。
以构造器Constructor(Object,Object,Object),实际参数为(Float,Double,Integer)为例。因为Float,Double,Integer均继承于Number,并且Number继承于Object,且Object不为接口。所以该构造器的差异度指数为6。
以此类推,对于每一个构造器,Spring都能根据继承关系算出它们的差异度,然后通过Spring差异度进行排序,并选择其中差异度最低的那个,来实例化bean。
Spring的源码中,对于构造器为Set,List,Map类型也进行了特殊的处理,所以Spring也能够通过使用Set,List,Map进行注入多余一个相同类型的bean。
Spring启动分析之多个构造器注入选择 https://segmentfault.com/a/1190000022521744
AutowiredAnnotationBeanPostProcessor
你知道Spring怎么确定实例化对象的构造器吗? https://juejin.cn/post/6850418118137741325
走过路过Spring推断构造器不要错过哦~ https://juejin.cn/post/6854573211359805447
构造器注入的优点(Spring为什么推荐构造器注入?)
构造器注入的好处: 1、构造器注入能够保证注入的组件不可变 2、构造器注入能够确保需要的依赖不为空。 3、构造器注入的依赖总是能够在返回客户端(组件)代码的时候保证完全初始化的状态。 构造器注入保证一些必要的属性在Bean实例化时就得到设置,并且确保了Bean实例在实例化后就可以使用。 4、方便单元测试,非IOC容器环境可使用new实例化该类的对象。 5、如果有循环依赖会直接提示错误:如果使用构造器注入,在spring项目启动的时候,就会抛出:BeanCurrentlyInCreationException:Requested bean is currently in creation: Is there an unresolvable circular reference?从而提醒你避免循环依赖 如果是field注入的话,启动的时候不会报错,在使用那个bean的时候才会报错(如果是spring能解决的循环依赖不会报错)。
field注入的缺点
容易出现空指针异常,Field 注入允许构建对象实例的时候依赖的示例对象为空,这就导致了空指针异常无法尽早的暴露出来 对单元测试不友好,如果使用 Field 注入,那么进行单元测试就需要初始化整个Spring 环境,将所有 Bean 实例化 会出现循环依赖的隐患 容易破坏单一职责原则
构造器注入与@RequiredArgsConstructor结合
构造器结合 lombok 的 @RequiredArgsConstructor 一起使用,会让代码更加简单
@Component
@RequiredArgsConstructor
public class ThankingService {

    private final Translator translator;

    public String produce() {
        return translator.translate("thank you");
    }
}
等价于
@Component
public class ThankingService {

    private final Translator translator;

    public String thank() {
        return translator.translate("thank you");


    /* Generated by Lombok */
    public ThankingService(Translator translator) {
        this.translator = translator;
    }
}
由于只有一个构造方法,Spring 可以唯一选择这个构造方法来初始化 ThankingService 并自动注入 Translator 实例。
Constructor Injection in Spring with Lombok https://www.baeldung.com/spring-injection-lombok
@Autowired @Qualifier("xx") 按名称匹配
如果容器中有一个以上匹配的Bean,则可以通过@Qualifier注解限定Bean的名称
出现这种情况通常有两种解决办法:
(1)、在配置文件中删除其中一个实现类,Spring会自动去base-package下寻找Car接口的实现类,发现Car接口只有一个实现类,便会直接引用这个实现类。
(2)、实现类就是有多个该怎么办?此时可以使用@Qualifier注解来指定Bean的名称:
package com.spring.model;

import org.springframework.beans.factory.annotation.Autowired;
import org.springframework.beans.factory.annotation.Qualifier;

import com.spring.service.ICar;

public class CarFactory {
    @Autowired
    @Qualifier("bmwCar")
    private ICar car;
    public String toString(){
        return car.getCarName();
    }
}
Spring的@Autowired注解 https://www.cnblogs.com/EasonJim/p/6895486.html
@Required 修饰set表示必须注入
用在set方法上,一旦用了这个注解,那么容器在初始化bean的时候必须要进行set,也就是说必须对这个值进行依赖注入。
Spring @Required 注释 http://wiki.jikexueyuan.com/project/spring/annotation-based-configuration/spring-required-annotation.html
@Autowired 默认按类型装配,如果我们想使用按名称装配,可以结合@Qualifier注解一起使用。如下: @Autowired @Qualifier("beanName") 存在多个实例配合使用 @Resource 默认按名称装配,当找不到与名称匹配的bean才会按类型装配。
@Scope 用于指定scope作用域的(用在类上)
@Autowired顾名思义,就是自动装配,其作用是为了消除代码Java代码里面的getter/setter与bean属性中的property。当然,getter看个人需求,如果私有属性需要对外提供的话,应当予以保留。
@Autowired 默认按类型匹配 的方式,在容器查找匹配的Bean,当有且仅有一个匹配的Bean时,Spring将其注入@Autowired标注的变量中。
必须告诉spring一下我要使用注解了,告诉的方式有很多,<context:component-scan base-package="xxx" />是一种最简单的,spring会自动扫描xxx路径下的注解。
@Autowired注解要去寻找的是一个Bean,Tiger和Monkey的Bean定义都给去掉了,自然就不是一个Bean了,Spring容器找不到也很好理解。那么,如果属性找不到我不想让Spring容器抛出异常,而就是显示null,可以吗?可以的,其实异常信息里面也给出了提示了,就是将@Autowired注解的required属性设置为false即可
@Primary
@Autowired 默认按照类型 Type 进行 bean 匹配,当一个接口有多个实现类的时候,Spring 就不知道该注入哪个了。
如何解决重复bean冲突?
有两种解决方法 @Primary 在其中一个 @Bean 上加 @Primary 表名此 Bean 应该被优先注入 @Qualifier 用 @Qualifier 给每个实现类取别名,注入时也指定名字
@Resource(name="x") 按名称匹配
@Resource 注解与 @Autowired 注解作用非常相似 @Resource 的装配顺序: @Resource 后面没有任何内容,默认通过name属性去匹配bean,找不到再按type去匹配 指定了name或者type则根据指定的类型去匹配bean 指定了name和type则根据指定的name和type去匹配bean,任何一个不匹配都将报错
@Resource 默认按名称装配,当找不到与名称匹配的bean才会按类型装配。
@Autowired 和 @Resource 都是用于依赖注入的注解,他们的主要异同如下: 相同点: 1、都可以用来装配bean。可以写在字段上,或写在setter方法上。 2、都可以作用在字段、setter方法和构造函数上。 3、都可以通过name属性来指定注入的bean。
不同点:
1、来源不同:@Autowired 是由 Spring 提供的注解,而 @Resource 是由 JSR 250 提供的注解。
2、注入方式不同:@Autowired 默认按类型装配(属于Spring),默认情况下必须要求依赖对象必须存在,如果要允许null值,可以设置它的 required 属性为false,如:
@Autowired(required=false),如果我们想使用名称装配可以结合 @Qualifier 注解进行使用,如下:
@Autowired() @Qualifier(“baseDao”)
private BaseDao baseDao;
而 @Resource 默认按照名称装配,可以通过 name 属性进行指定,如果没有指定 name 属性,当注解写在字段上时,默认取字段名进行按照名称查找,如果注解写在setter方法上默认取属性名进行装配。当找不到与名称匹配的bean时,会回退为按类型装配。可以通过name和type属性进行更精确的控制,如下:
@Resource(name=“baseDao”)
private BaseDao baseDao;
3、@Autowired 注解 require 属性默认是 true,如果找不到匹配的 Bean 就会报错。而 @Resource 注解是默认不检查的,即默认是 required=false,如果找不到匹配的 Bean 就不会注入。
@Autowired 可以配合 @Qualifier 使用以满足更多复杂的需求,而 @Resource 没有相应的配套注解。
@Value注解
@Value 和 @Autowired 的实现原理
@Value 同 @Autowired 的实现原理一样,是由 AutowiredAnnotationBeanPostProcessor 这个后处理器解析处理的
org.springframework.beans.factory.annotatio.AutowiredAnnotationBeanPostProcessor 类中,在 spring 容器加载了 bean 的定义文件并且实例化 bean 之后会回调到对应的 post处理方法上,最终调用到 findAutowiringMetadata() 方法上构造 autowired 元数据然后注入。
InjectionMetadata findAutowiringMetadata(String beanName, Class<?> clazz, PropertyValues pvs) 中通过调用 buildAutowiringMetadata() 方法来构建元数据
InjectionMetadata buildAutowiringMetadata(final Class<?> clazz) 方法中会解析目标类的所有 field 属性 和 method 方法(@Value 也能用在方法上),这里有一点儿需要注意,解析属性和方法时会剔除 static 静态属性和 static 静态方法,报个 warn 错误但不影响编译和运行,这也就是为什么 @Value 无法给静态属性和方法注入值。最终包装成 InjectionMetadata 类型放入缓存用于注入。
private InjectionMetadata buildAutowiringMetadata(final Class<?> clazz) {
    LinkedList<InjectionMetadata.InjectedElement> elements = new LinkedList<InjectionMetadata.InjectedElement>();
    Class<?> targetClass = clazz;

    do {
        final LinkedList<InjectionMetadata.InjectedElement> currElements =
                new LinkedList<InjectionMetadata.InjectedElement>();

        ReflectionUtils.doWithLocalFields(targetClass, new ReflectionUtils.FieldCallback() {
            @Override
            public void doWith(Field field) throws IllegalArgumentException, IllegalAccessException {
                AnnotationAttributes ann = findAutowiredAnnotation(field);
                if (ann != null) {
                    if (Modifier.isStatic(field.getModifiers())) {
                        if (logger.isWarnEnabled()) {
                            logger.warn("Autowired annotation is not supported on static fields: " + field);
                        }
                        return;
                    }
                    boolean required = determineRequiredStatus(ann);
                    currElements.add(new AutowiredFieldElement(field, required));
                }
            }
        });

        ReflectionUtils.doWithLocalMethods(targetClass, new ReflectionUtils.MethodCallback() {
            @Override
            public void doWith(Method method) throws IllegalArgumentException, IllegalAccessException {
                Method bridgedMethod = BridgeMethodResolver.findBridgedMethod(method);
                if (!BridgeMethodResolver.isVisibilityBridgeMethodPair(method, bridgedMethod)) {
                    return;
                }
                AnnotationAttributes ann = findAutowiredAnnotation(bridgedMethod);
                if (ann != null && method.equals(ClassUtils.getMostSpecificMethod(method, clazz))) {
                    if (Modifier.isStatic(method.getModifiers())) {
                        if (logger.isWarnEnabled()) {
                            logger.warn("Autowired annotation is not supported on static methods: " + method);
                        }
                        return;
                    }
                    if (method.getParameterTypes().length == 0) {
                        if (logger.isWarnEnabled()) {
                            logger.warn("Autowired annotation should only be used on methods with parameters: " +
                                    method);
                        }
                    }
                    boolean required = determineRequiredStatus(ann);
                    PropertyDescriptor pd = BeanUtils.findPropertyForMethod(bridgedMethod, clazz);
                    currElements.add(new AutowiredMethodElement(method, required, pd));
                }
            }
        });

        elements.addAll(0, currElements);
        targetClass = targetClass.getSuperclass();
    }
    while (targetClass != null && targetClass != Object.class);

    return new InjectionMetadata(clazz, elements);
}
细节知多少 - spring @Value注解解析(讲的很详细) https://juejin.im/post/6844903904732266510
@Value 给静态变量注入值
Spring 中 @Value 只能给普通变量注入值,无法给静态变量注入值。
@Value("${my.value}")
private static String myValue;
上面的代码虽然编译和执行都不会报错,但 myValue 的值是 null
原因在于,spring 依赖注入是依靠 set 方法实现的,spring 在解析类的 field 成员进行自动注入时,会跳过 static 变量和方法(见 buildAutowiringMetadata 源码),所以 static 变量和方法是无法进行 @Autowired 和 @Value 注入的。
如何实现静态变量注入? 通过非静态 set 方法设置静态变量的值。 @Value 注解的非 static 方法可以被 spring 自动处理,在里面修改静态变量的值即可。
import org.springframework.beans.factory.annotation.Value;
import org.springframework.stereotype.Component;
import lombok.Getter;

@Component
public class GlobalValue {
    @Getter
    public static String DATABASE;

    @Value("${mysql.db:test}")
    public void setDatabase(String db) {
        DATABASE = db;
    }
}
spring @value 注入static 注入静态变量方法 https://blog.csdn.net/ZYC88888/article/details/87863038
@Value 列表 List 注入
yml中:
myList: a, b, c
或
myList: >
  a
  b
  c
Java 中:
@Value("${myList}")
private List<String> myList;
https://stackoverflow.com/questions/26699385/spring-boot-yaml-configuration-for-a-list-of-strings
@Value 注解默认值
变量名后加冒号加默认值,语法为:
@Value("${some.key:my default value}")
private String stringWithDefaultValue;
例如:
// int默认值
@Value("${datasource.maximum-pool-size:100}")
private int mysqlMaximumPoolSize;

// string默认值
@Value("${some.key:my default value}")
private String stringWithDefaultValue;

// 默认空字符串
@Value("${some.key:}")
private String stringWithBlankDefaultValue;

// boolean默认值
@Value("${some.key:true}")
private boolean booleanWithDefaultValue;
数组默认值,可自动解析逗号分隔字符串为Array数组
@Value("${some.key:one,two,three}")
private String[] stringArrayWithDefaults;

@Value("${some.key:1,2,3}")
private int[] intArrayWithDefaults;
默认值中可以再引用变量,实现按优先级依次读取多个变量,如下:
@Value("${consul.token:${CONSUL_TOKEN:${spring.cloud.consul.token:${SPRING_CLOUD_CONSUL_TOKEN:${spring.cloud.consul.discovery.acl-token:}}}}}")
private String aclToken;
Using Spring @Value with Defaults https://www.baeldung.com/spring-value-defaults
自动化装配
Spring从两个角度来实现自动化装配: 组件扫描(component scanning):Spring会自动发现应用上下文中所创建的bean。 自动装配(autowiring):Spring自动满足bean之间的依赖。
@Component注解,这个简单的注解表明该类会作为组件类,并告知Spring要为这个类创建bean 组件扫描默认是不启用的。我们还需要显式配置一下Spring,从而命令它去寻找带有@Component注解的类,并为其创建bean。 @ComponentScan注解,@ComponentScan默认会扫描与配置类相同的包以及这个包下的所有子包,查找带有@Component注解的类。
缺点:如果第三方库中没有注解,无法将其自动装配到应用中。
Java config 装配
XML装配(不建议)
声明需要的xml名称空间与模式文档
<beans xmlns="http://www.springframework.org/schema/beans"
  xmlns:xsi="http://www.w3.org/2001/XMLSchema-instance"
  xsi:schemaLocation="http://www.springframework.org/schema/beans http://www.springframework.org/schema/beans/spring-beans.xsd">
构造器注入
当Spring发现这个<bean>元素时,它将会自动调用class对应的默认构造器来创建bean。
构造器注入初始化bean的两种方法:
1、<constructor-arg>元素
constructor-arg 元素注入
<bean id="compactDisc" class="soundsystem.SgtPeppers" />

<bean id="cdPlayer" class="soundsystem.CDPlayer">
  <constructor-arg ref="compactDisc" />
</bean>
2、使用Spring 3.0所引入的c-命名空间
使用c-命名空间的属性无法实现装配集合的功能。
在<beans>中声明c命名空间:
xmlns:c="http://www.springframework.org/schema/c"
<bean id="cdPlayer" class="soundsystem.CDPlayer" c:cd-ref="compactDisc" />
解释:
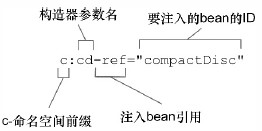
属性名以"c:"开头,也就是命名空间的前缀。接下来就是要装配的构造器参数名,在此之后是"-ref",这是一个命名的约定,它会告诉Spring,正在装配的是一个bean的引用,这个bean的名字是compactDisc,而不是字面量"compactDisc"
字面量注入
ref属性用来引用其他的bean value属性用来指定字面量,即常量值
集合注入
java代码:
public class BlankDisc implements CompactDisc {
  private String title;
  private String artist;
  private List<String> tracks;

  public BlankDisc(String title, String artist, List<String> tracks) {
    this.title = title;
    this.artist = artist;
    this.tracks = tracks;
  }

  public void play() {
    System.out.println("Playing " + title + " by " + artist);
    for (String track : tracks) {
      System.out.println("-Track: " + track);
    }
  }
}
xml配置:
<bean id="compactDisc" class="soundsystem.collections.BlankDisc">
  <constructor-arg value="Sgt. Pepper's Lonely Hearts Club Band" />
  <constructor-arg value="The Beatles" />
  <constructor-arg>
    <list>
      <value>Sgt. Pepper's Lonely Hearts Club Band</value>
      <value>With a Little Help from My Friends</value>
      <value>Lucy in the Sky with Diamonds</value>
      <value>Getting Better</value>
      <value>Fixing a Hole</value>
      <value>She's Leaving Home</value>
      <value>Being for the Benefit of Mr. Kite!</value>
      <value>Within You Without You</value>
      <value>When I'm Sixty-Four</value>
      <value>Lovely Rita</value>
      <value>Good Morning Good Morning</value>
      <value>Sgt. Pepper's Lonely Hearts Club Band (Reprise)</value>
      <value>A Day in the Life</value>
    </list>
  </constructor-arg>
</bean>
set和list元素的区别不大,其中最重要的不同在于当Spring创建要装配的集合时,所创建的是java.util.Set还是java.util.List。如果是Set的话,所有重复的值都会被忽略掉,存放顺序也不会得以保证。不过无论在哪种情况下,set或list都可以用来装配List、Set甚至数组
设置属性
设置属性的两种方式:
<property>元素- p-命名空间
<property>元素为属性的Setter方法所提供的功能与<constructor-arg>元素为构造器所提供的功能是一样的。
p-命名空间注入
在<beans>中声明p命名空间:xmlns:p="http://www.springframework.org/schema/p"
p-命名空间注入bean引用
<bean id="cdPlayer" class="soundsystem.properties.CDPlayer" p:compactDisc-ref="compactDisc" />
解释:
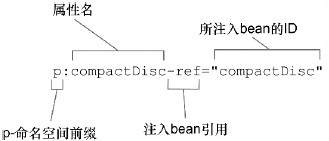
p-命名空间注入字面量
<bean id="compactDisc"
    class="soundsystem.properties.BlankDisc"
    p:title="Sgt. Pepper's Lonely Hearts Club Band"
    p:artist="The Beatles">
XML集合注入实例
Java代码:
import java.util.List;
import java.util.Map;
import java.util.Properties;
import java.util.Set;

public class Customer
{
    private List<Object> lists;
    private Set<Object> sets;
    private Map<Object, Object> maps;
    private Properties pros;

    //...
}
Spring配置:
<beans xmlns="http://www.springframework.org/schema/beans"
    xmlns:xsi="http://www.w3.org/2001/XMLSchema-instance"
    xsi:schemaLocation="http://www.springframework.org/schema/beans
    http://www.springframework.org/schema/beans/spring-beans-2.5.xsd">

    <bean id="CustomerBean" class="com.mkyong.common.Customer">

        <!-- java.util.List -->
        <property name="lists">
            <list>
                <value>1</value>  <!-- 元素为字符串 -->
                <ref bean="PersonBean" /> <!-- 元素为其他bean的引用 -->
                <!-- 元素为bean -->
                <bean class="com.mkyong.common.Person">
                    <property name="name" value="mkyongList" />
                    <property name="address" value="address" />
                    <property name="age" value="28" />
                </bean>
            </list>
        </property>

        <!-- java.util.Set -->
        <property name="sets">
            <set>
                <value>1</value>  <!-- 元素为字符串 -->
                <ref bean="PersonBean" /> <!-- 元素为其他bean的引用 -->
                <!-- 元素为bean -->
                <bean class="com.mkyong.common.Person">
                    <property name="name" value="mkyongSet" />
                    <property name="address" value="address" />
                    <property name="age" value="28" />
                </bean>
            </set>
        </property>

        <!-- java.util.Map -->
        <property name="maps">
            <map>
                <!-- key键为String key-ref键为其他bean的引用 -->
                <!-- value值为String value-ref值为其他bean的引用 -->
                <entry key="Key 1" value="1" />
                <entry key="Key 2" value-ref="PersonBean" />
                <entry key="Key 3">
                    <bean class="com.mkyong.common.Person">
                        <property name="name" value="mkyongMap" />
                        <property name="address" value="address" />
                        <property name="age" value="28" />
                    </bean>
                </entry>
            </map>
        </property>

        <!-- java.util.Properties -->
        <property name="pros">
            <props>
                <prop key="admin">admin@nospam.com</prop>
                <prop key="support">support@nospam.com</prop>
            </props>
        </property>

    </bean>

    <bean id="PersonBean" class="com.mkyong.common.Person">
        <property name="name" value="mkyong1" />
        <property name="address" value="address 1" />
        <property name="age" value="28" />
    </bean>

</beans>
Spring中注入List,Set,Map,Properties http://www.cnblogs.com/rollenholt/archive/2012/12/27/2835122.html
【Spring实战】—— 7 复杂集合类型的注入 http://www.cnblogs.com/xing901022/p/4249033.html
混合装配
在Spring中,可以将JavaConfig的组件扫描与自动装配、JavaConfig装配、或XML配置混合在一起。 在自动装配时,Spring并不在意要装配的bean来自哪里。自动装配的时候会考虑到Spring容器中所有的bean,不管它是在JavaConfig或XML中声明 的还是通过组件扫描获取到的。